Income Tax India e-Filing Portal Login, Registration, and File ITR for FY 2020-21
The new income tax portal was launched with a lot of swaggers, as the next generation portal regarding ease of filing return, reducing the processing time, and new additional features, but it all proved to be fabulist and facile like a maxim in Hindi,” Khoda pahad, nikli chuhiya, wo bhi mari hui”. Even after two and a half months of its launch, it was recently closed due to emergency maintenance and the CEO of Infosys was summoned by the finance ministry on 23 August for a reproach session.
This speaks volumes of our software prowess, or Infosys has taken the Indian government for a ride, or our Income tax laws are so contorted that even the computer has surrendered itself. Why Infosys has still not been penalized is the question, which is constantly bugging the minds of the taxpayers and the tax professionals. Are they again going to be let off after the GST portal’s fiasco?
Be that as it may, today we are going to tell you about registering and logging in to the new income tax portal and filing your return as an individual. Also, we shall see important points to remember before starting to file your return.
Related Topic:
Calculation Of Income Tax And Filing Of ITR On Income Tax Portal
Guide to register, login, and file your return on the New income tax website
Every taxpayer in India has to be a registered user on the Income-tax department website compulsorily. After becoming a registered user, one can access previous years’ tax returns, file his return, e-verify the income tax returns, check refund status, etc.
1. Registering into the portal
The previous website for filing your income tax return was www.incometaxindiaefiling.gov.in. But now it has been made defunct and a new website www.incometax.gov.in was launched with a lot of drum-beating on 7 June 2021.
If you have never logged in to the portal (old or new) before, then you have to get yourself registered before logging in to the portal. If you were registered in the old portal then there is no need to register again. Your password will remain the same.
2. Prerequisite for Individuals to Register on Income Tax Portal
Before you register on the income tax portal, you must ensure that you have the following details handy with you;
- Valid PAN ( it will be verified on the portal)
- Valid Mobile Number ( you will receive OTP )
- Valid Current Address
- Valid Email Address, preferably your own ( you will receive OTP )
A Minor, person of unsound mind, or anyone who is considered incompetent to contract as per Indian Contract Act, 1872 are ineligible to register on the income tax portal.
Related Topic:
New Revised Due dates under Income Tax Act 1961 AY 21-22
3. Steps of Registration
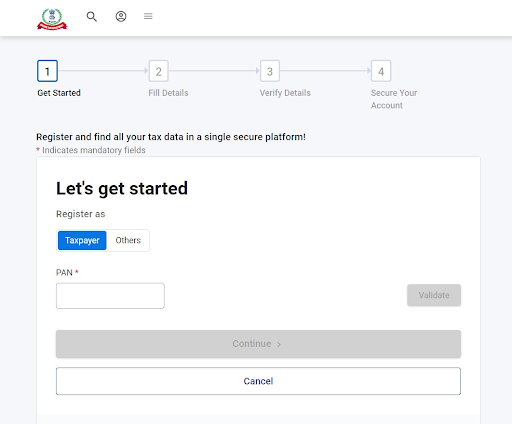
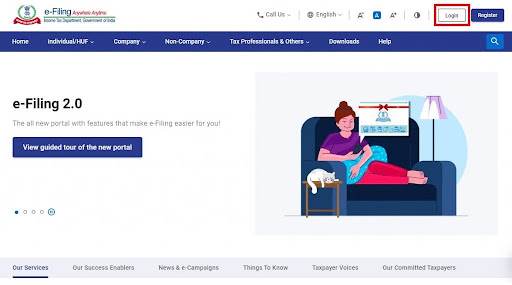
Step 1: Visit the income tax department portal
On its homepage, click on ‘Register’ on the right-hand side of the page.

Step 2: Enter your PAN
- Choose your registration status. Click on ‘taxpayer’ as you are registering as a taxpayer.
- Enter your PAN in the available space and then click,’ validate’.
- After that, select ‘Yes’ if you are an individual taxpayer. Otherwise, click ‘no’. This is very important to be done correctly as your next screen will be opened accordingly.
- Then click on ‘Continue’.
Related Topic:
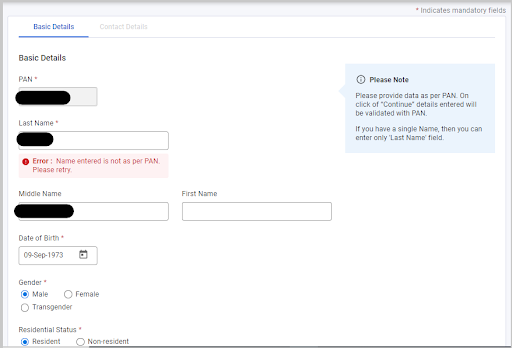
Step 3: Enter the Basic Details
- Enter your personal details such as first name, middle name, and last name.
- Then select gender and residential status. We have chosen residential status as ‘Resident’
Related Topic:
Best Salary Structure to Save Income Tax
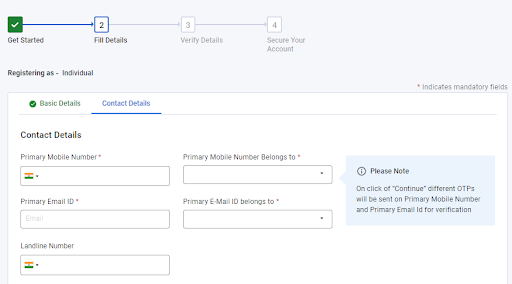
Step 4 Provide your contact details
Fill in the following communication details. You will receive OTP both on mobile and by email. Therefore make sure that they both are correct and currently active.
- Mobile number
- Email ID
- Postal address details
After you have correctly entered all the details, click, ‘Continue’ to reach the next screen
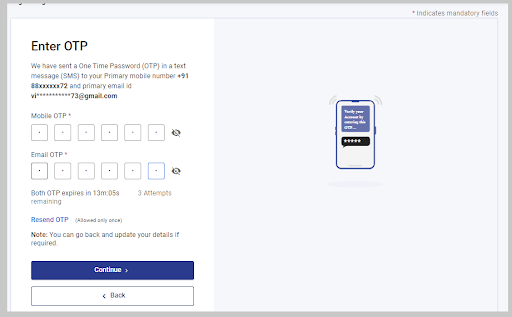
Step 5: Verification
- After submitting the form, a six-digit One Time Password (OTP) is sent to your mobile number and the email ID provided. Enter both the OTPs correctly to successfully verify the details.
- Please note that in the case of non-residents, the OTP is only sent to the registered email address.
Step 6 Verification of the entered details.
- After validating the OTP, you will get a new window on your screen to verify the entered details.
- If you want to do any corrections, you can go back to the previous screen, do the necessary corrections, and again validate the same with OTPs received.
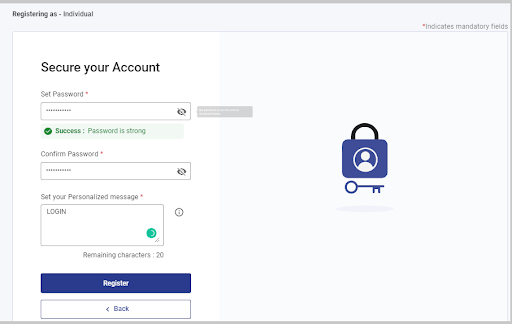
Step 7: Set your password.
- After verification, set a password for your account and set up a secure login message.
- Enter the set password again correctly to confirm it.
- The password should be a strong password, having a combination of uppercase letters, lowercase letters, and special characters.
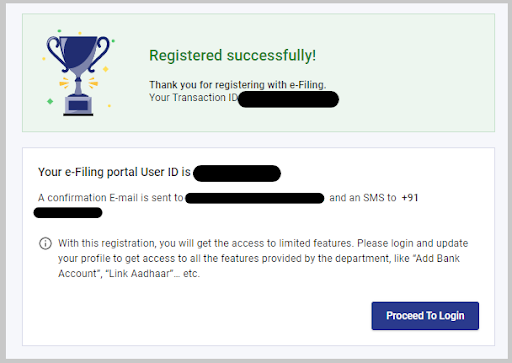
Step 8: Click on ‘Register’.
- Click on the ‘Register’ button and you will receive an acknowledgment number ( Transaction Id) both on the mobile and email after a successful registration. Now you can log in to the portal and avail the services offered by it.
- Your PAN will be the user id and the password will be the one, set by you just now.
- After login, you can get access to other features of the portal like linking your bank account and your Adhaar number with the PAN.
Related Topic:
Top 10 Income Tax Courses in India
4. Logging into the portal
Step 1: Visit the income tax department homepage (www.incometax.gov.in)
- To access the income tax login page, visit the homepage of the government portal.
- Here, you will see a box on the top-right side that has a ‘Login’ button for registered users. Click on ‘login’.
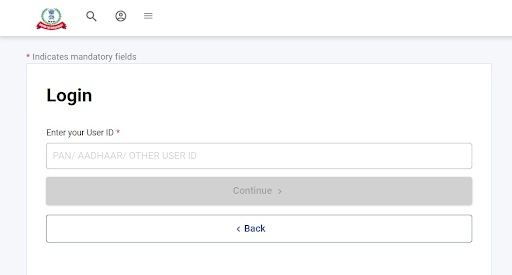
Step 2: Enter your credentials.
- After clicking on ‘login’, you will be taken to the login page, where you have to enter your income tax login username and continue to proceed further.
- Please note, for income tax login, the user ID is your PAN card number.
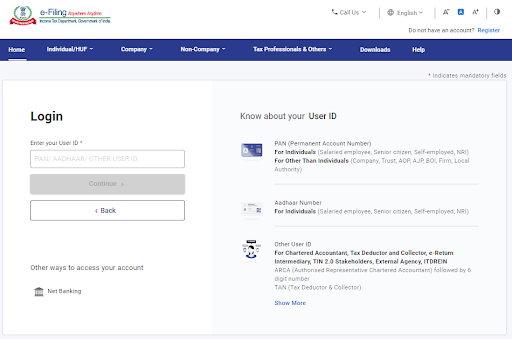
- After proceeding further, confirm your secure access message and enter the correct password, which you made just now, or the same password from the previous portal.
- Next, click on skip and it will take you to the dashboard page for availing of the various services including filing your return for the F/Y 2020-21.
Notes
(A) You cannot log in to the income tax portal without a valid password. However, if you have forgotten your password, you can reset it. Click on “forgot password” and reset your password. You can choose to reset your password using any of the below three options:
- By receiving OTP on your mobile number registered with the income tax portal
- By receiving OTP on the mobile number registered with Aadhaar or
- By uploading your DSC.
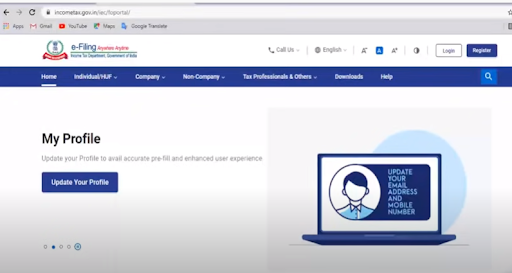
(B) To change your registered mobile number, log on to the income tax filing portal www.incometax.gov.in.
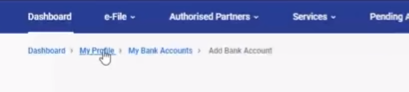
- Then go to ‘My profile’ by clicking on your profile image > contact.
- Click on the edit button on the right-hand corner and change the mobile number.
(C) In order to register yourself as a ‘Chartered Accountant’, and log in as a CA, log on to the income tax filing portal www.incometax.gov.in.
- After clicking ‘Register’ from the top right corner of the home page, click on the ‘Others’ tab instead of ‘taxpayer’ and select the category as ‘Chartered Accountant’ and click ‘Continue’.
- A new window will appear which will ask your personal and professional details like membership number, enrollment date, PAN, name, and date of birth. On successful validation, the contact details page will appear.
- Enter all mandatory contact details such as mobile number, email ID, and address and click on ‘Continue’. Make sure that the mobile and email id are currently active.
- You will receive a six-digit OTP on your registered mobile number and email ID. Enter the OTP number received and click on ‘Continue’.
- Verify your details and confirm to proceed further. On the next page, you will be required to set your new password.
- Set your password and click on ‘Register’. Your login ID would be your membership number and not your PAN number. Password would be chosen as per the password policy.
Related Topic:
5. Some Important Points to Remember While Filing Your Return
(A) Choosing your ITR form
If you want to file your return, then you must know which ITR form you should choose. It is dependent upon your income heads, amount of income, and your status (person as per IT act) of earning income. To learn more about ITR forms, you can read our article Calculation Of Income Tax And Filing Of ITR On Income Tax Portal”
(B) Keep the handy interest of both savings and Fixed deposit Account and form 16 or salary slips
TDS is deducted only on FD interest, and both interests have to be disclosed in the ITR. Salary income is to be entered from form 16. For senior citizens deduction under 80TTB is on both interests.
(C ) Remember to report Exempt income as well
If you have received any exempt income then it has to be disclosed.
(D) File return if gross income is more than maximum income not chargeable to Tax
If your gross income is more than maximum income not chargeable to tax, then also you have to file a return. It does not matter if your net taxable income is less or more than maximum income not chargeable to Tax.
(E) Bank account added should be correct and prevalidated
A bank account is necessary to be attached with the portal in order to receive a refund if any. It should also be prevalidated otherwise you will not be able to receive it.
(F) Also file a return if you have capital gains like on sale of jewelry, painting, etc.
Don’t forget to disclose income under Capital Gains and choose the form accordingly.
(G) If TDS is deducted or TCS is collected, file a return to get a refund. Make sure all the entries are showing in 26 AS otherwise contact the concerned person
If your TDS has been deducted, or TCS has been collected, then it does not mean that you have not filed the return. You have to file a return to receive your refund if any.
(H) Make gross-up of income received after deducting TDS
While disclosing income received, when TDS has been already deducted, then gross up the income amount.
(I) Take deductions under section 80 for various investments
Make sure you get all the applicable deductions on your eligible investments.
(J) Determine which tax regime you have to choose.
If you do not have any investment, then you can go for, a new regime of taxation. For making a comparison between old and new schemes you can go to < www.incometaxindia.gov.in, where you will find a tax calculator in the tools section to make the correct decision.
(K) File return if you fall under the seventh proviso of section 139(1)
If you fulfill any of the conditions mentioned in the proviso of section 139(1), then filing of return is mandatory.
(L) Decide how you have to file your return, “Offline or online”
If you are using form 1 or 4, then you can use an online method. It is recommended also because most of your data is pre-filled with the already available information. If you are using any other form then you have to compulsorily use an offline method.
Related Topic:
How to File the Income Tax Return of a Salaried Person in 2021
- Filing your return for the F/Y 2020-21
We shall learn to file returns in form 1 and form 4 online mode. This mode is available for these two types of returns only.
ITR 1 (Sahaj)
STEP 1: Login the portal
- Go to the website www.incometax.gov.in. Then on the right-hand side, upper corner of the home page, click Login. Your PAN no is your user ID.
- Enter your PAN no. and password
- After logging in you will reach the profile page.

- It is better you complete your profile because then you can use all the functionalities of the portal. Though you may still file your return.
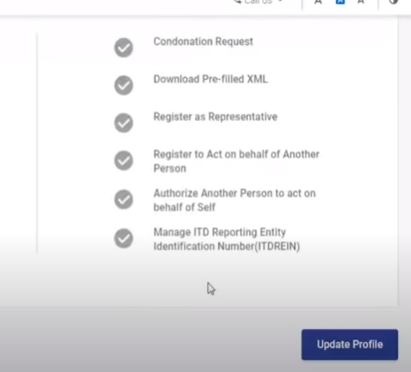
- You can use the services check-marked in green even without completing your profile.
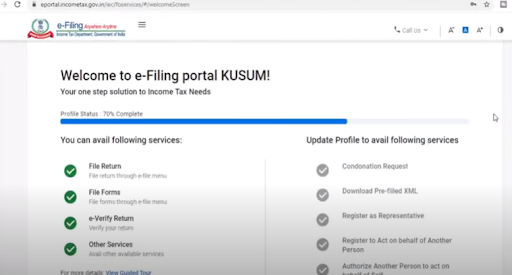
- But to use the below-mentioned services you have to complete your profile.
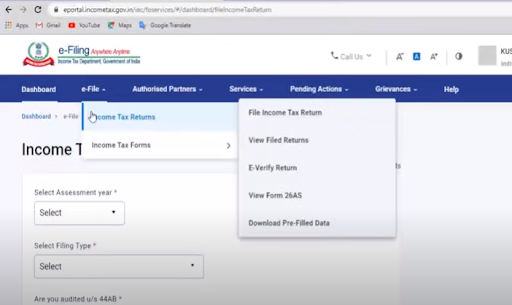
- On your dashboard, you can see the ‘e-file option’. Upon clicking that option you will see the next screen is asking for the ‘assessment year’ of which you want to file the return.
- Enter the assessment year (2021-22) and also select the mode of filing your return.
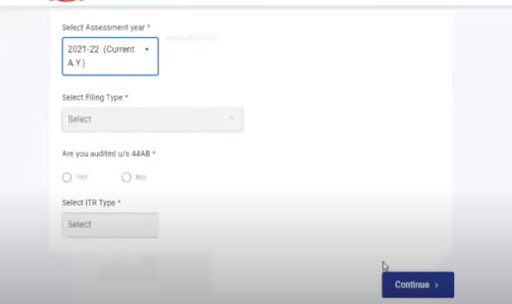
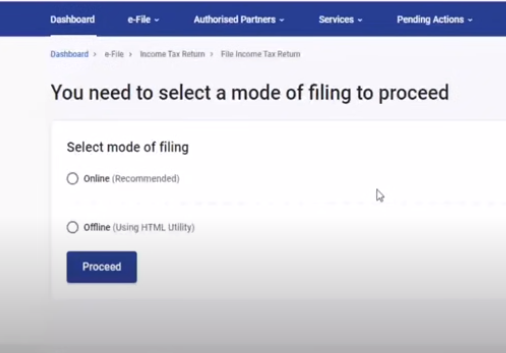
- Since you are filing a return in form 1, by the online mode, select online mode. Then press ‘Proceed’
- Then you are asked if you have been audited u/s 44AB. Select ‘No” and then press ‘Continue’
STEP 2 Add the bank account details
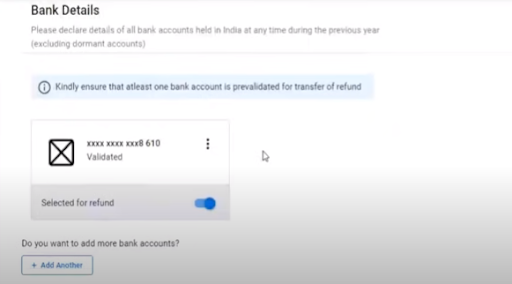
- It is better if you at least complete your bank details in My Profile>My bank Account. Because it would be necessary for receiving your tax refund if any.

- Enter your account number and its type and then confirm it.
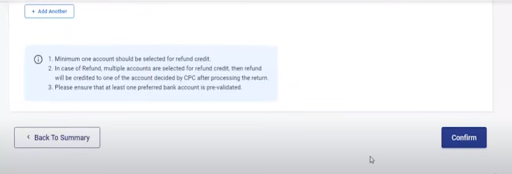
- If your bank is already added, then check if it is prevalidated. It is necessary to receive a refund. If your bank is not prevalidated then add another bank account.
- Because sometimes the portal is taking indefinite time to prevalidate the bank account.
STEP 3 Preparing for filing the Return (View 26 AS)
- Click on ‘file. Select “ Income Tax Returns”.
- Upon selecting, You will see a drop-down list. Before filing your return, you must view your form 26AS.
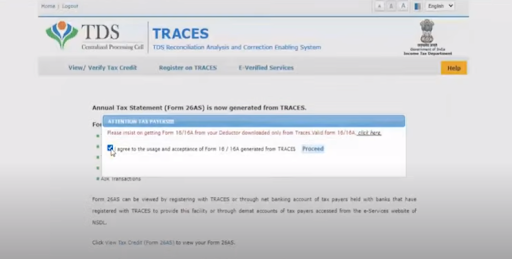
- Click on ‘View form 26AS’
- You will be taken to the “TRACES” website. Click on the affirmation and Proceed.
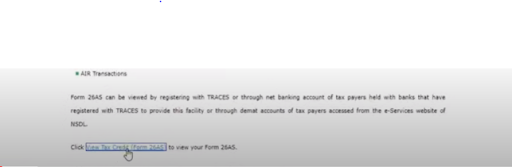
- Then click on “View Tax Credit/ Form 26 AS”.
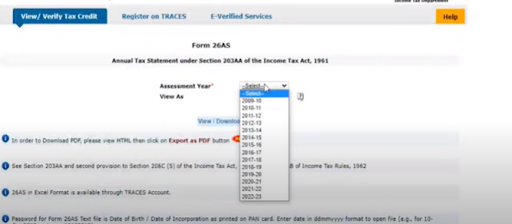
- You shall be asked to enter the assessment year. Enter the current assessment year (2021-22).
- Then click on “ View/ Download”. Then click on the “HTML” view. You can also download it in PDF form by choosing “Export in PDF”.
- Check that all the TDS deducted/ TCS collected is appearing in your form.
- If not, then confirm with that person, otherwise, it will be very difficult to get a refund later on.
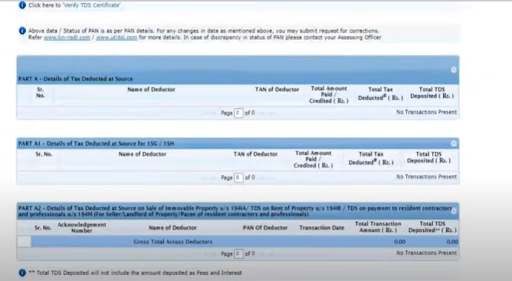
- Also, check if there is any discrepancy in the amounts of tax or payment shown in the form.
- Since you have no business turnover, the column of GST turnover would be empty.
- Then again go to ‘e- file’ and click on “ File Income Tax return”
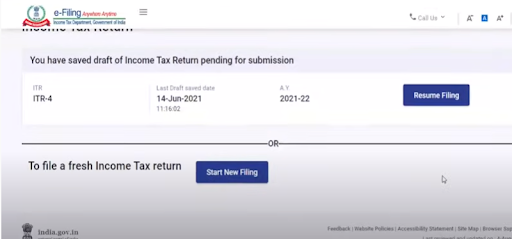
- Then you will reach your return page. If you have already started filing your return then you have to select “ Resume filing” or if you want to start filing a fresh return then select “ Start New filing ”
- The data once entered by you is automatically saved, and you don’t need to save it every time.
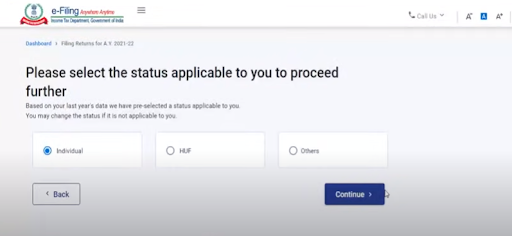
STEP 4: Choosing the return form and your status as a taxable person
- Now select your status as a taxable person. Since your last return was filed as an ‘individual’, the department has already chosen ‘individual’ for you. You can also change it to ‘HUF’ or ‘others’. In ‘others’ only ‘partnership firm’ is applicable.
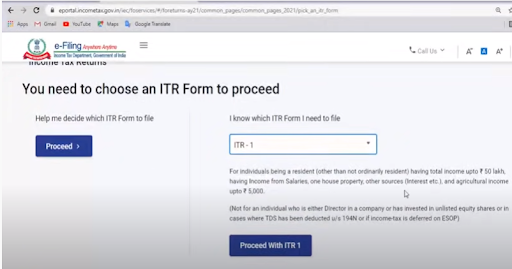
- Now choose which form you want to use. Since you do not have any business income, you have to choose from 1. It is chosen if the assessee has only salary income, income from House property (1 house), income from other sources, and the gross total income does not exceed 50 lakhs. The assessee should not have business income, should not be a director in any company, and should not hold any unlisted shares.
- You have been provided with the various conditions in which you can choose form 1. To learn more about ITR forms, you can read our article,” Calculation Of Income Tax And Filing Of ITR On Income Tax Portal”. Then click,” proceed”
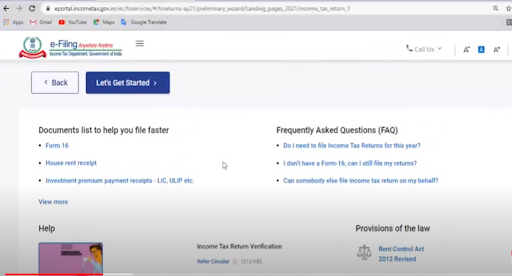
- The next screen will show the various documents needed by you to file your return. Like, Form 16, Receipts of House rent received if any, Receipts of any investments made by you.
- Then click on, “ Let’s Get started ”
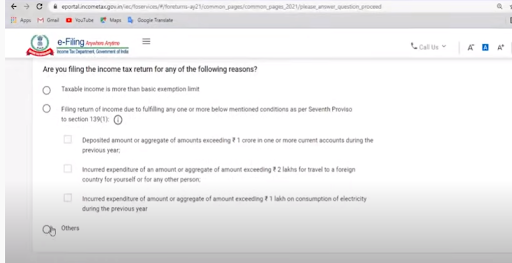
- The next screen will ask you the reason for your filing the return.
- Is your gross income more than the maximum amount exempt from tax or do you satisfy the conditions mentioned in the seventh proviso to section 139(1).
- Checkmark the reason applicable to you, or click ‘others’ if filed for some other reason.
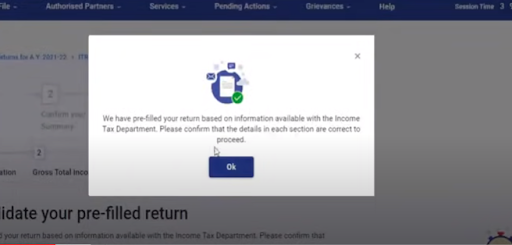
- Then a pop-up will appear, telling you that the department has already pre-filled some tabs with the information available with it. Click ‘OK’
Related Topic:
How To File ITR Using The New Filing Portal of Income Tax
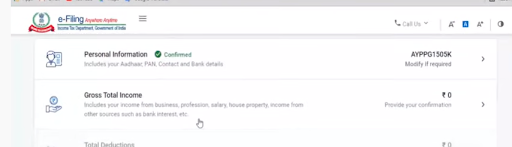
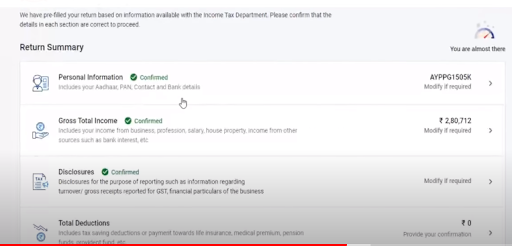
STEP 5: Filing your return
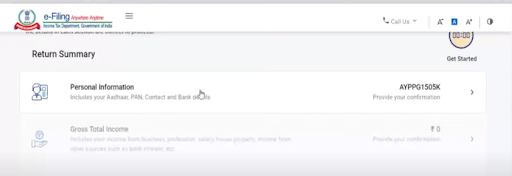
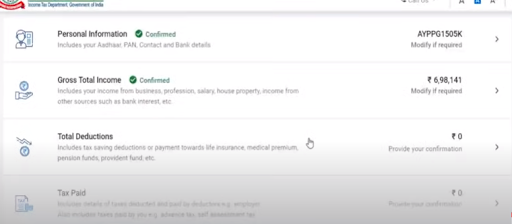
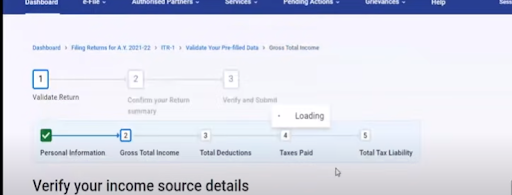
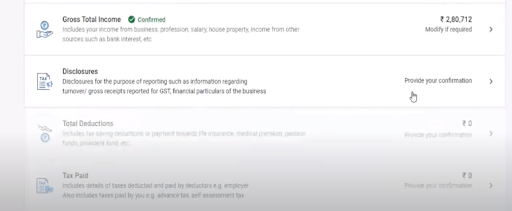
The whole process is divided into 5 parts.
- Personal information of the taxpayer.
- Gross Total Income
- Total deductions
- Tax already paid
- Total tax liability
Each part has to be completely filled and confirmed to activate the next part.
STEP 6: Personal information
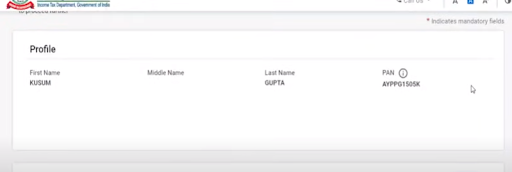
- Your First, middle, and last name along with PAN no. and date of birth will be auto-filled. You cannot edit them. Therefore if it is not showing, you have no other option, than to wait, and file later.
- You can edit your AADHAR number and bank details (as told you in the starting)

- Enter your contact details. Like your address, landline no., mobile no. and e-mail id
- There may be a mismatch between the address in the PAN card and the address in the previous return filed by you ( it may be the address as per AADHAR). Then you have to get your PAN updated.
- This mismatch may even cause a verification error at the end of the return. Therefore be cautious while verifying the return and make changes accordingly.
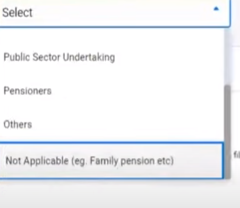
- Then you have to enter your nature of employment i.e in which sector you are employed, Government or private, pensioner, PSU, or other.

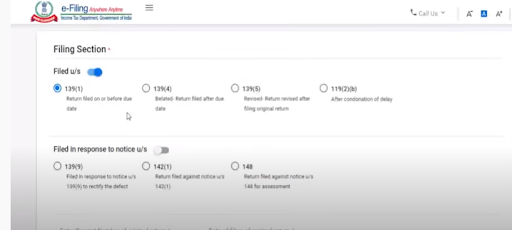
- You have to enter the section under which you are filing your return. Since you are filing within the due date, and not in reply to any notice, therefore, your applicable section will be 139(1), which is already selected.
- You are provided with the information regarding various sections under which you can file your return.
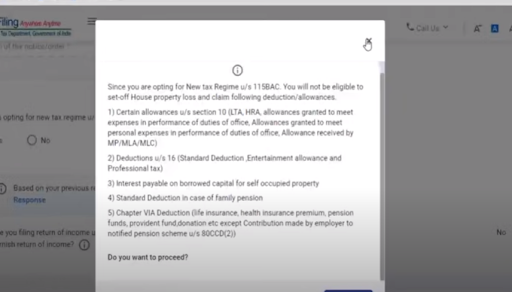
- Then you have to determine if you want to file your return as per the new tax regime u/s 115 BAC. If you will opt for ’Yes’, then a pop-up will appear informing you about the conditions for making such an option. Upon opting you shall not get the standard deduction under salary and also no deduction under section 80 except 80(CCD2)
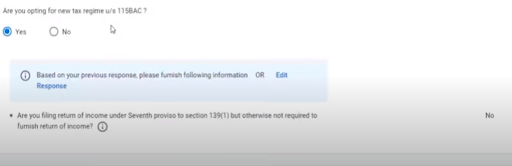
- Then click ’proceed’ to move further. If you opt ’No’, then you will be taxed as per the old regime. If you have made some investments then you should go for the old tax regime. Based on your response the next screen will be visible. We are assuming that you have made certain investments and hence opted for the old regime.
- Secondly, it will ask again if you are filing your return under the seventh proviso of section 139(1). You have to answer ‘NO’.
- If you will choose the new tax regime, then for ITR forms 3 to 6, you will have to file a declaration under form 10 IE. This form is not necessary for ITR forms 1 and 2. Therefore you do not have to file it.
Related Topic:
New Regime of Income Tax Search and Seizure Assessments – Glaring Implications
STEP 7: Gross Total income
- Under this head, the portal will collect and confirm, all the information regarding the three heads of income, namely income from salaries, house property, and other sources.
(a) Income from salary
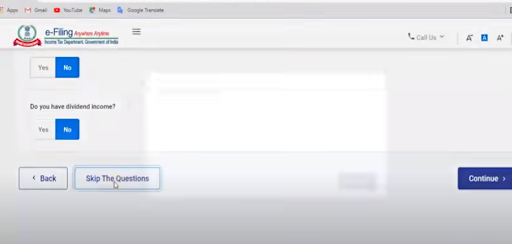
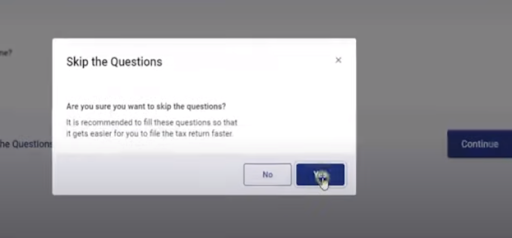
- You can enter the information in a questionnaire manner or a drop-down list format. For this head, it is better to go by the drop-down list method. Therefore ‘skip’ the questionnaire and move further. A pop-up will appear asking to skip the questionnaire. You have to select ‘Yes.
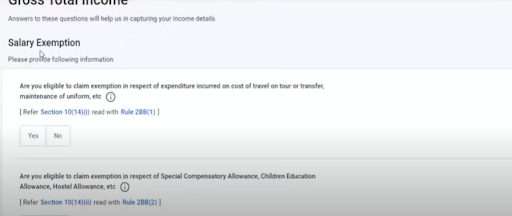
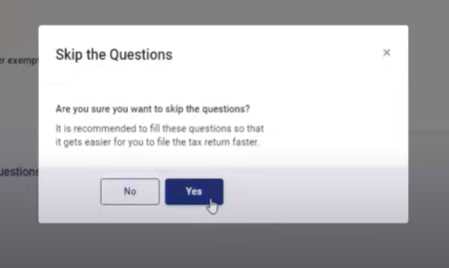
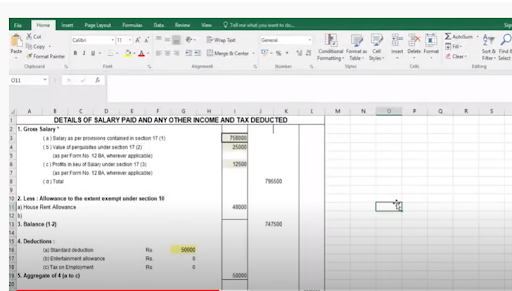
- Then you have to enter the amounts from your Form 16 (shown below) into the spaces given. There are different sections under which you have received your salary. Enter the amounts section-wise namely sec 17(1), 17(2), 17(3).
- If you have received any salary under any allowance and it is not reflecting in form 16, you yourself should never enter it. Because it can cause a mismatch in form 16, and your return, and may result in a show-cause notice.
- If you do not have form 16, then don’t worry. Total the amounts of your salary slips and enter them. It is better if you enter section-wise, but if you don’t have the bifurcation enter the full amount in section 17(1). Never enter any amount wrongly or arbitrarily.
- If you have received a salary from multiple employers, then you will have more than one form 16. Add the salary amount from all and enter it. Do not add the number of deductions twice. As information regarding deductions is taken by all the employers to calculate your TDS. It does not mean that you will get the benefit of deductions twice.
(Form 16)
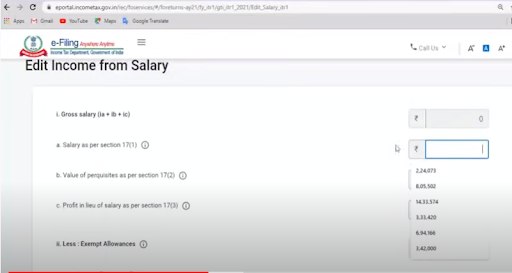
- The portal may be showing some pre-filled values. First, check them and then enter them. These amounts are editable. You can make corrections at any stage you want.
- If any tab is mandatory and you don’t want to enter any amount, enter zero. For non-mandatory tabs leave them vacant.
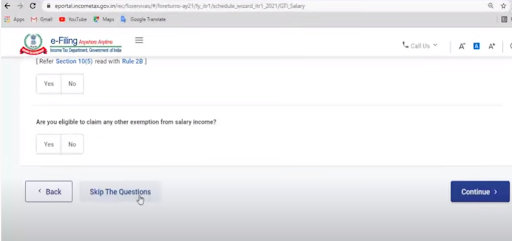
- If you have received any arrears or advance of salary, then it has to be mentioned separately. That amount shall qualify for rebate u/s 89. Also, you have to file form 10 E to avail relief u/s 89
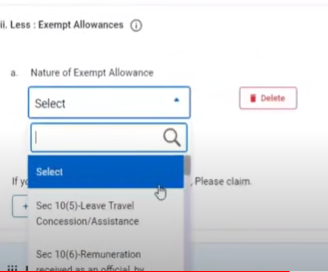
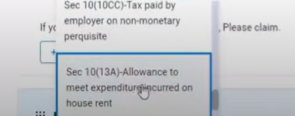
- Enter the exempt amounts from the drop-down list as shown below.
- Then enter the exempt allowances given in form 16. Do not enter any exempt allowance which is not appearing in form 16.
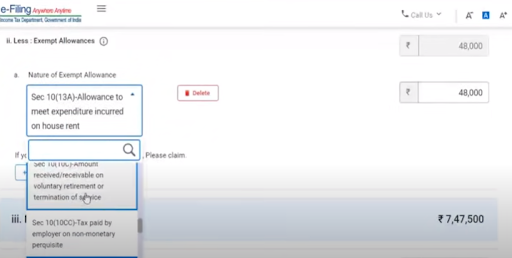
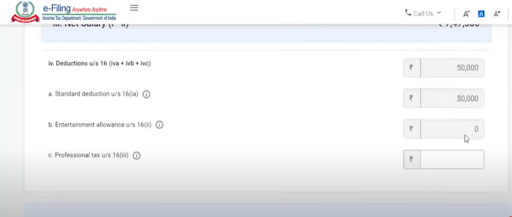
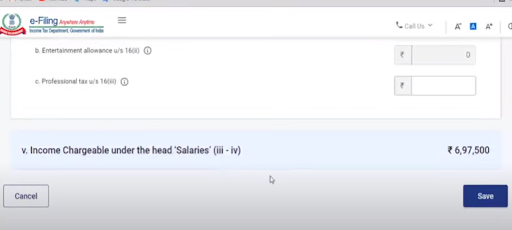
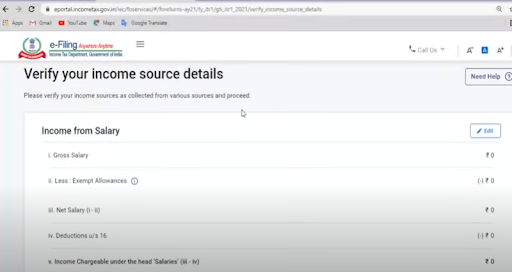
- The portal will itself take the standard deduction and calculate the amount of ‘income from the head salary’. Check the amount, it should be the same as in form 16
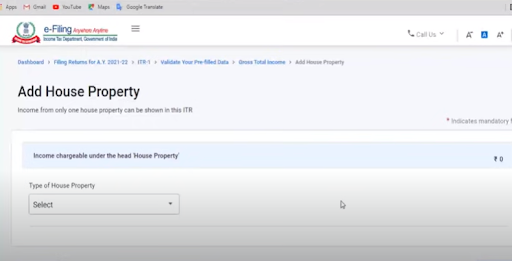
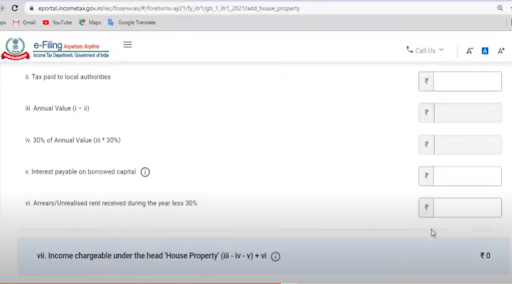
(b) Income from House property
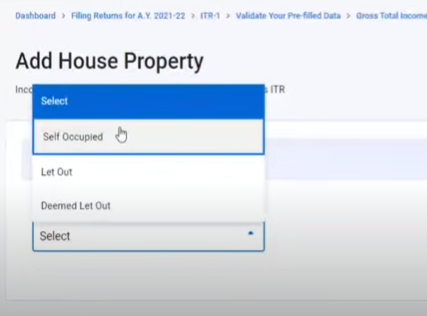
- We shall add only one house property which is self-occupied. It means its annual value as per taxation purposes will be taken as zero.
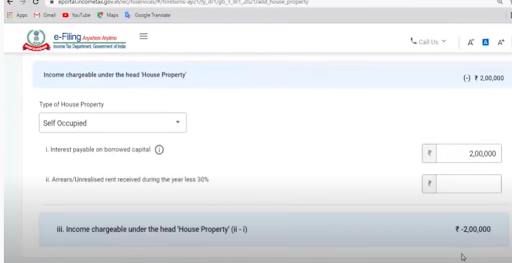
- Select the category of the house property as ‘Self-occupied’. For such property, the deduction for interest paid on home loans will be restricted up to 2 lakhs. It will be shown as a negative figure under ‘income from house property. You have to enter your interest paid amount. You can get the interest figure from the interest certificate provided by the financial institution from where you have taken the loan.
- If you have given any portion of your house on rent and you are receiving any rent, then your house will not be treated as self-occupied. There will be its annual value as well. You will also get deductions for municipal taxes paid and 30% of Annual value. The deduction for interest will not be restricted to 2 lakhs. It will be the actual amount paid as interest.
- Any negative figure (loss) from ‘income from house property shall be adjusted against income from other heads.
- The only loss adjustable against ‘income from salaries’ is ‘loss from house property.
Related Topic:
CBDT grants further relaxation in electronic filing of Income Tax Forms 15CA/15CB
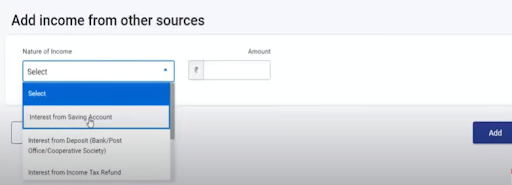
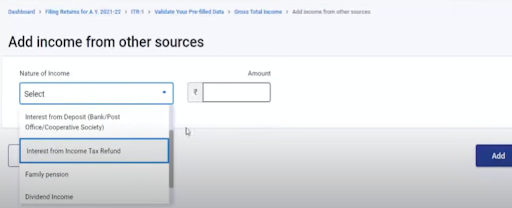
(c) Income from other sources
- You will have the option to enter information in a questionnaire manner or a drop-down list format. For this head also it is better to go by the drop-down list method. Therefore ‘skip’ the questionnaire and move further. A pop-up will appear asking you to skip the questionnaire. You have to select ‘Yes.
- Add income from interest on savings accounts and fixed deposits in banks or post offices separately.
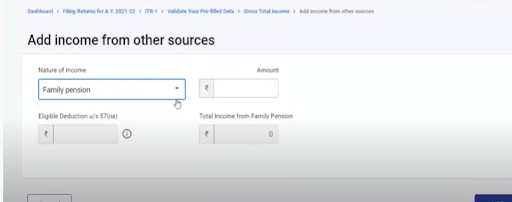
- Income from any other interest (apart from savings and term deposits), dividend, family pension, winnings from lotteries, etc has to be disclosed.
- Most income is received after TDS. Therefore gross up the amount before entering on the portal.
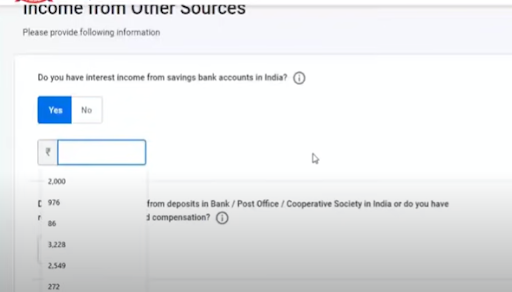
- For entering incomes of various kinds you have to choose the type from the dropdown list. Enter the amount in front of that option. Then click ‘Add’.
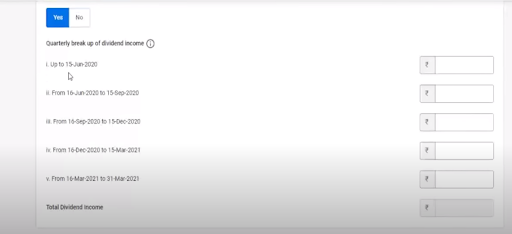
- The dividend received from the Indian company was not taxable in the hands of the receiver till last year. Now it has been made taxable. It has to be entered quarterly, as shown below.
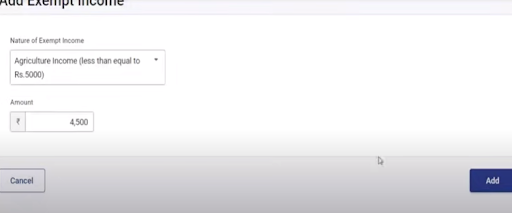
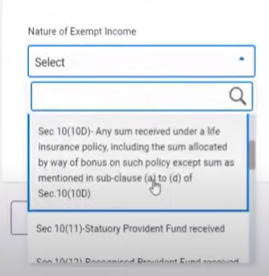
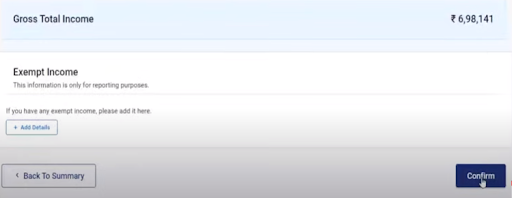
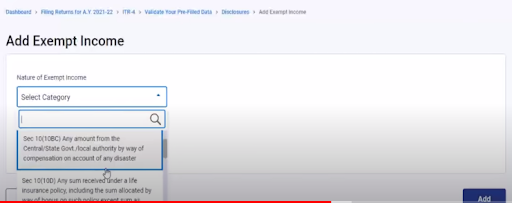
(d) Disclosure of exempt income
- Though such income is not added to the taxable income but is mandatory to be disclosed
- You have to enter any exempt income received by you, under the exempt income section.
- You can choose the type of exempt income like agricultural income, maturity amount of life insurance, statutory provident fund or recognized provident fund, etc. from the drop-down list.
- Enter the amount in front of the option and click,’ Add’.
- Confirm the entries made in the Gross total income section. Then the next part will be activated.
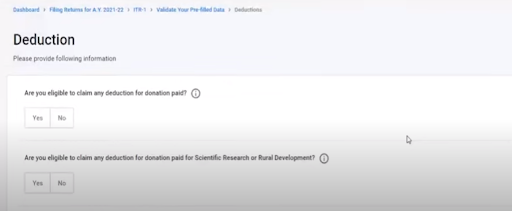
STEP 8: Total Deductions
- In this part also you can make the entries in the questionnaire format or drop-down list manner.
- Here you can go by questionnaire method as all the different sections are given separately.
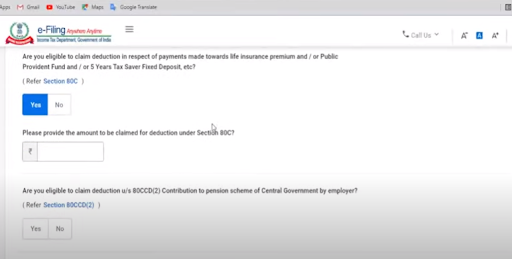
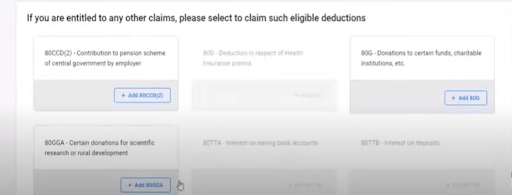
- Since you have opted for the old taxation regime, therefore all the deduction tabs are activated. Mostly used sections are 80 C, 80 D, 80 CCD1, 80 CCD2, 80 TTA, 80TTB etc. If you had opted for the new scheme then only 80 CCD2 would have been applicable.
- Enter the amounts of investments applicable for 80 C like principal repayment of home loan, Life insurance premium paid, tuition fees of children, etc.
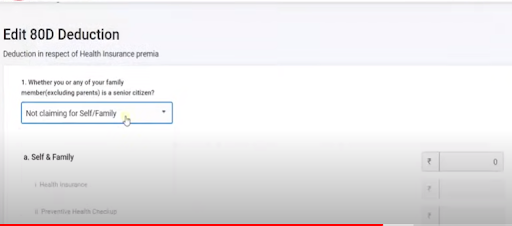
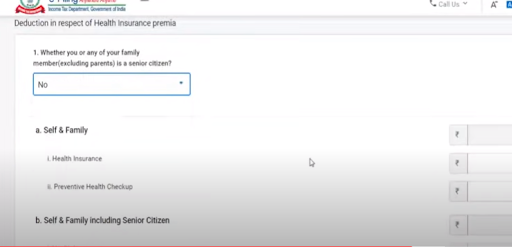
- Enter the amounts of medical insurance paid by you, for your family and parents under 80 D. If you have not paid medical insurance premium for any senior citizen member of your family then, medical expense made for senior citizens up to 50000 is also deductible.
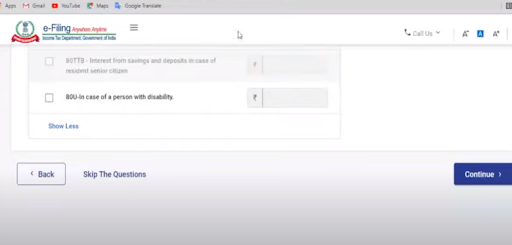
- Under 80 TTA, savings bank account interest up to 10000 is deductible. For senior citizens, this deduction is applicable for up to 50000 on both savings and term deposits under 80 TTB.
- 80 E is for interest paid on loans taken for the higher education of your children.
- 80 CCD1 and 80 CCD2 are for contributions made to the National pension scheme.
- During this Carona pandemic, many people have donated to the PM cares Fund. This donation is 100% deductible without any limit u/s 80G. You have to fill the schedule u/s 80 G. Some people have reported that this schedule is not working properly.
- After entering and confirming all the deductions, the next part of the return is enabled.
Related Topic:
STEP 9 Taxes Paid
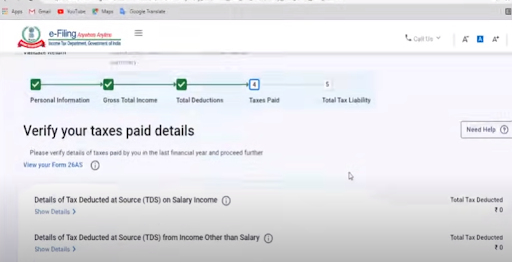
- As you have already downloaded form 26 AS, check all its entries and segregate them according to the information asked. If you have form 16, compare the number of TDS deducted by the employer and the amount reflecting 26 AS.
- Collect all the amounts of TDS deducted under salary, other than salary (interest), and deducted by your tenant on the rent paid if applicable ( form 16C).
- Also, calculate any amount of TCS, and advance tax paid by you.
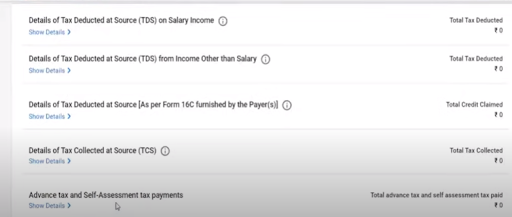
- Enter all these amounts separately in the space provided.
- If after making all the entries, any amount of tax is still liable to be paid, then the return will be filed only after payment of balance tax. Do not forget to enter that amount as well, because without making that entry the liability will not become nil.
- If your TDS has been deducted and it is not reflecting in the form 26 AS, then do not enter that amount here. Enter those amounts only which are reflected in form 26 AS. Get clarification from that person if he has not filed his TDS return or made any mistake. It is better to wait for some time before filing the return without that TDS.
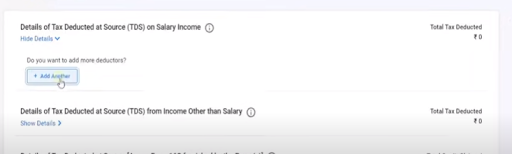
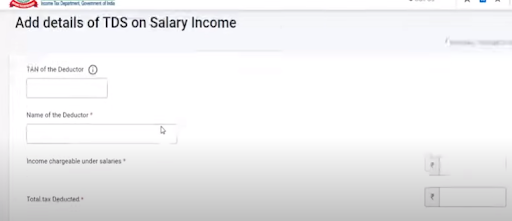
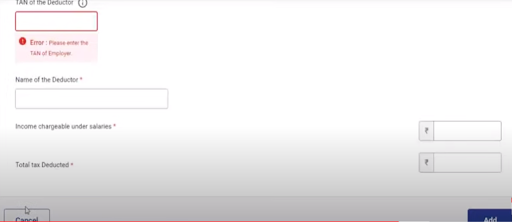
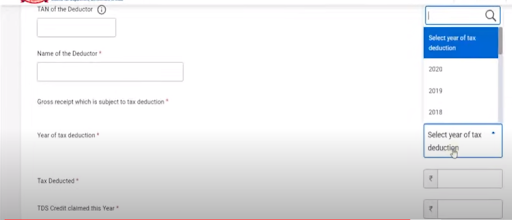
- For making any entry of TDS, you have to first add the Deductor. Enter his ‘TAN’ and ‘name’.
- Then enter the gross amount on which he has deducted the TDS and the amount of TDS. Then click,’ ADD’
- You have to mention the following years.
- The year of deduction, and the year in which such TDS has been claimed.
- You have to enter separately, the number of TDS deducted and the amount of TDS claimed by you through this return in this financial year. In most cases, the same amount is entered in both columns.
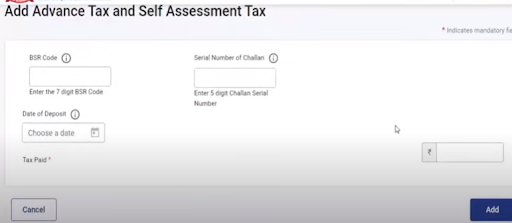
- For making the entry of advance tax paid, you have to enter the serial no. of the challan, the date of deposit, and the BSR code. Then click,’ ADD’.
- TDS is only a method of tax collection, not taxpayers. Tax is considered paid when the return is filed and is adjusted against the tax liability.
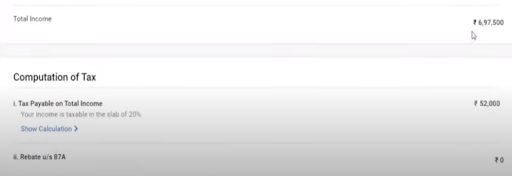
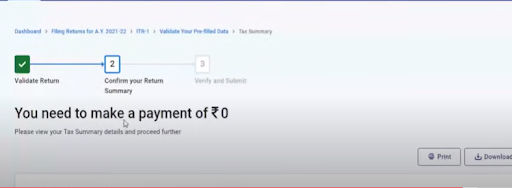
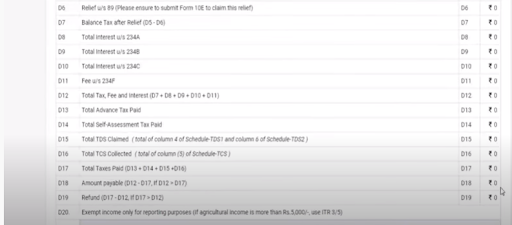
STEP 10 Computation of Taxable Income, Tax on it, and the total Tax liability
- After completing all four parts, the last part of Total tax liability will be activated.
- Your taxable income, amount of tax along with any interest shall be calculated automatically.
- You have to recheck all the amounts carefully, especially the deductions, exemptions, and taxes already paid. After payment of tax, it would not be possible to rectify them.

- You can view the computation and find if there is any rectification or pending entry that has to be made. Make yourself completely satisfied that there is no omission or mistake.
- If you are satisfied, see if there is any balance tax liability to be paid. Without paying the balance amount the return will not be filed.
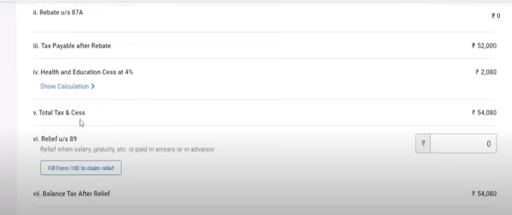
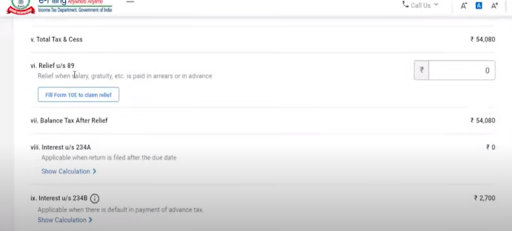
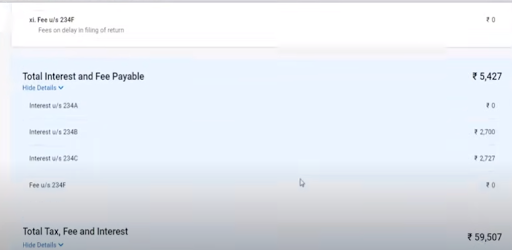
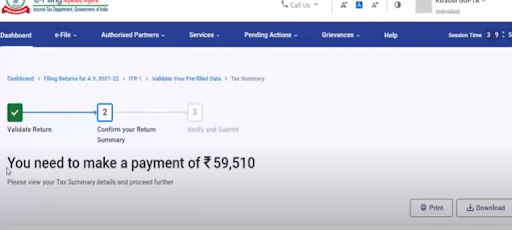
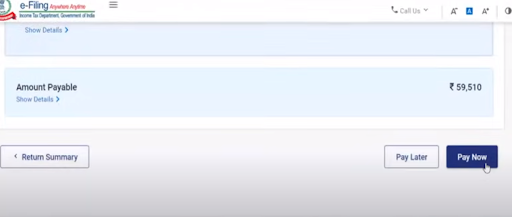
- Download the challan for making the payment of tax.
- You can make the payment through electronic means.
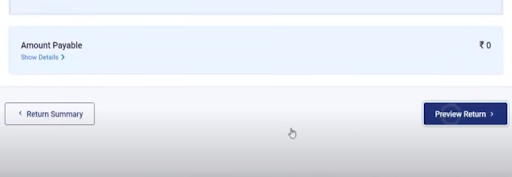
- At any time, you can go back to your return summary by clicking on ‘Return summary’ and you can view your return by clicking on ‘Preview return’.
- After making the payment, add that amount to the Taxes paid section. This will make the tax liability nil. Now you can proceed further to file your return.
- In case, your total tax paid is more than the tax liability then, the portal will say that you have a refund of such amount. Then you have to check the amount of refund.
- You have to file for tax refund while filing your return. The refund will be made through the prevalidated bank account after your return is processed by the department.
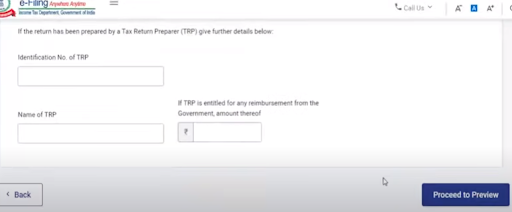
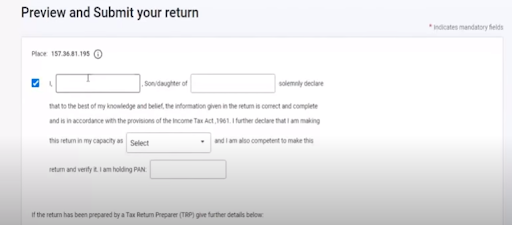
- Since your return is not prepared by any tax return preparer, leave those columns vacant.
- Double-check the personal information like address, bank details, PAN, etc.
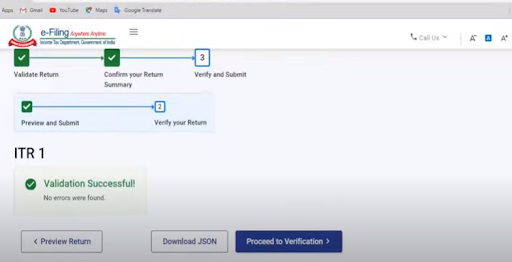
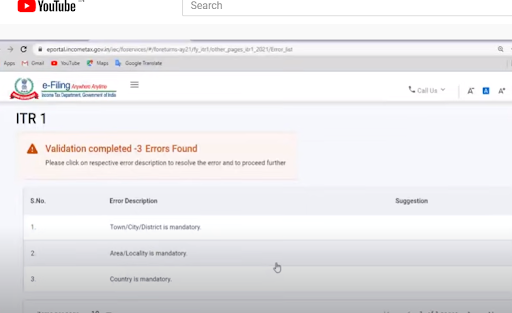
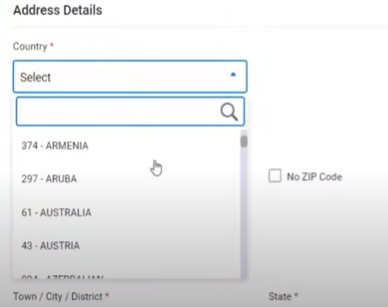
- During validation, any error regarding address may crop up due to non-mentioning/ wrong entry, of country, city, and locality. All these are mandatory fields. You have to click on each of the errors and it will take you directly to the place where it has to be rectified. Correct/ enter the information to remove errors
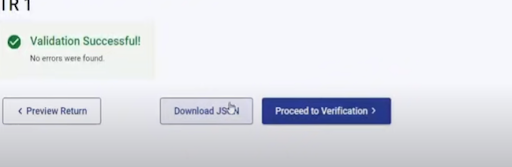
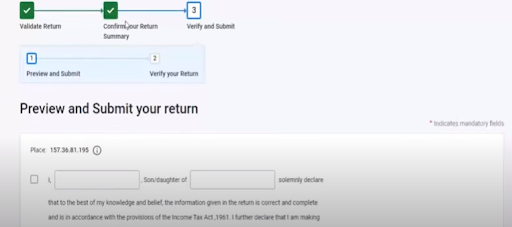
- After successful validation, preview the return once more and then ‘Proceed to Verification’.
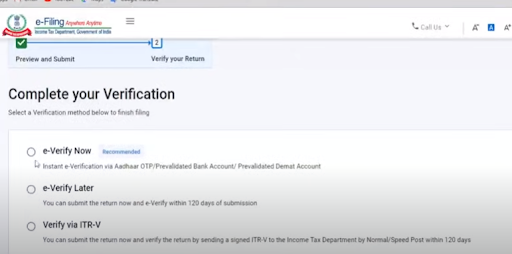
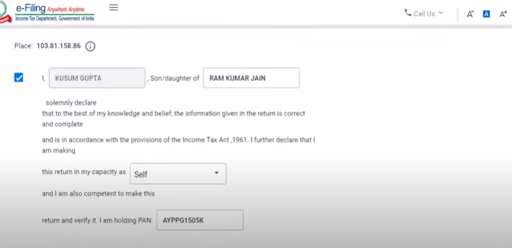
- You have been provided with three choices to verify your return. It is recommended to e-verify now.
- You can also verify later. But you have to send the signed copy of ITR-V to the Bengaluru office of the I.T. Department.
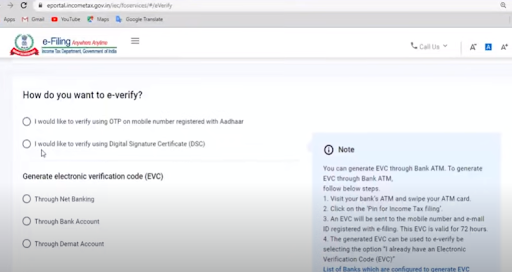
- For an individual, it is best to verify by using the OTP method received on the AADHAAR linked mobile phone.
- You can also verify using your D.S.C.
- Thus you have successfully filed your I.T. return for the F/Y 2020-21 on the new portal.
ITR 4
The procedure for filing ITR 4 is similar to the procedure of ITR 1. There are a few differences as follows;
- This return also includes ‘income from business and profession’ on a presumptive basis under sec 44AD, 44ADA, 44AE.
- Form no. 10 IE has to be filed if you are opting for the new tax regime.
- One more part, “ Disclosures “ has also to be filled.
We are going to tell you only those parts which are different or new. You have to log in to the income tax portal in the same manner. Complete your profile and bank details. Select taxable person (individual), online mode, choose old regime, and section 139(1) for return filing. Also, select the reason for return filing and select ‘No’ for the seventh proviso of sec 139(1).
STEPS:
(1) Choosing of the ITR Form
- You have to now choose ITR 4 and ‘ Proceed ‘.
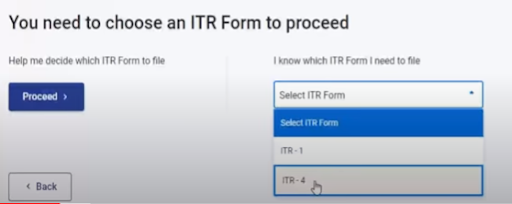
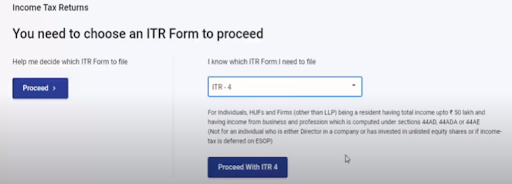
- This form is chosen when you have a gross total income up to 50 lakhs, sources of income are salary, house property, business, and profession under presumptive basis (sec 44 AD, 44ADA, 44AE), and other sources.
- The taxable person is an individual/ HUF/ partnership firm and the individual is not a director in any company nor holds any unlisted equity shares.
- This form is not available for income from capital gains, businesses, and professions where income is less than the minimum prescribed percentage or where the accounts books have to be audited and profit is calculated in the normal manner.
(2) Income under Business and Profession (44AD, 44ADA, 44AE)
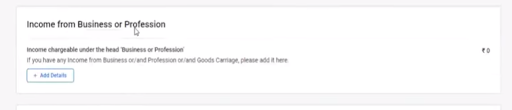
- Click “ Add Details ” to include this head under ‘gross total income.
- Since only three sections are applicable. We shall go one by one.
(a) Section 44 AD
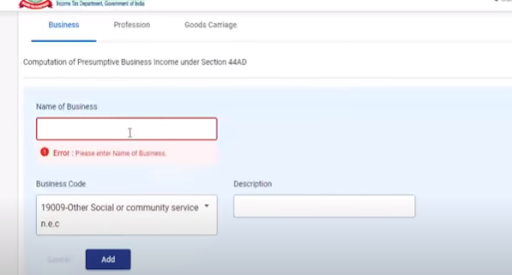
- For sec 44AD. Click on ‘Business’ on the dashboard. Enter the name of the business (as on the PAN card). Since you are an individual, you have to enter your own name. This field is mandatory.
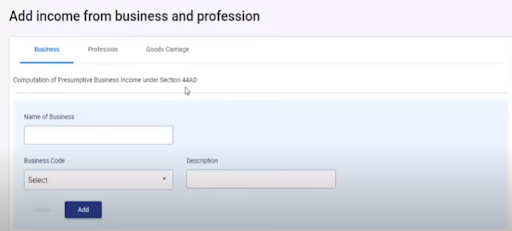
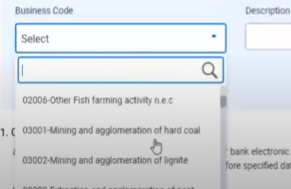
- Select the business code from the drop-down list. The description is not mandatory. Then click ‘Add’.
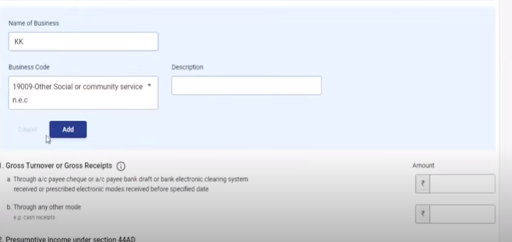
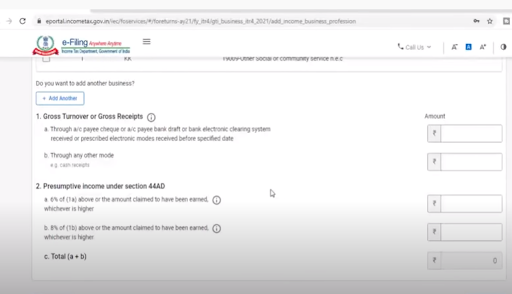
- Under this section, the total receipts of your business are considered as your turnover. You have to segregate the receipts into two parts.
- The first part of the receipts is by banking mode like A/c Payees cheque, draft, RTGS, NEFT, etc. The profit % prescribed is 6%.
- The second part of the receipts is by any other mode. (other than banking mode) The profit % prescribed is 8%.
- This section prescribes the minimum percentage of profit to be declared as income earned. You can declare more than that % also. If you want to declare a lesser profit than the prescribed %, then you have to get your accounts audited and then you would not be eligible for this section and this form.
- The total annual turnover should not exceed 2 crores to be eligible under this section.
- You shall not be allowed to take a deduction of any other business expense. But all the deductions under sec 80 would be available.
- Upon opting for this section you shall be exempt from getting your books of accounts audited u/s 44AB, even if your turnover is more than 1 crore.
- You have to choose this scheme for a minimum of 5 continuous years.
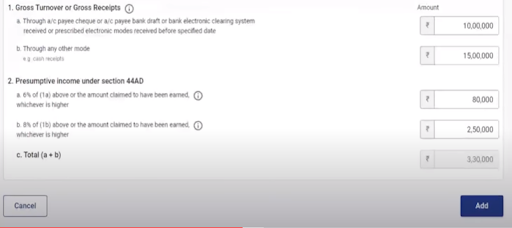
- Suppose your total turnover is 25 lakhs. Turnover by banking channels is 10 lakhs and by any other mode is 15 lakhs.
- Then you have to declare a minimum profit of 6% of 10 lakh and 8% of 15 lakh i.e. 60000 and 120000. You can declare profit more than that but not less than that.
- Enter your respective amounts and click ‘Add’.
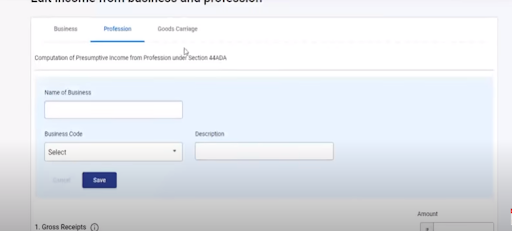
(b) Section 44ADA
- Click on ‘Profession’ on the dashboard.
- This section is applicable to professionals whose annual turnover does not exceed 50 lakhs.
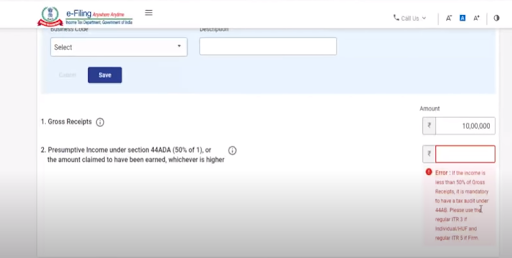
- The minimum profit % to be declared is 50%.
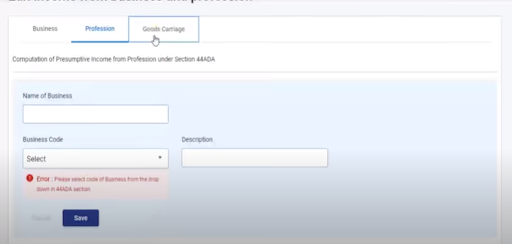
- You have to enter your name and business code. Then press, ‘save’.
- Suppose your turnover is 10 lakhs, then you have to declare a minimum of 5 lakhs as profit from the profession.
- Now you enter your respective amounts and click, ‘save’
(c ) Section 44AE
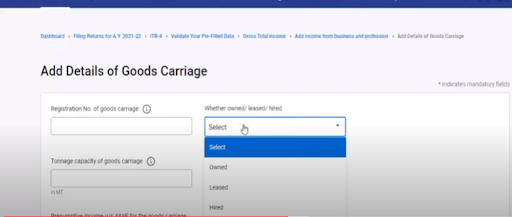
- You have to click on ‘Goods Carriage’.
- This scheme of section 44AE can be adopted by a person who is engaged in the business of plying, hiring, or leasing goods carriages and who does not own more than 10 goods vehicles at any time during the year.
- For Heavy Goods Vehicle (capacity more than 12 metric tonnes), income will be computed at the rate of Rs. 1,000 per ton of gross vehicle weight for every month or part of a month during which the heavy goods vehicle is owned by the taxpayer.
- In the case of vehicles other than heavy goods vehicles, income will be computed at the rate of 7,500 for every month or part of a month during which the carriage of the goods is owned by the taxpayer. Part of the month would be considered as a full month.
- Enter the name of the business and business code. Then click on ‘save’.
- First, enter the details of vehicles owned/ leased/ hired by you. Click on ‘Add Another.
- Enter the registration no., tonnage capacity and select whether owned/ leased/ hired by you.
- Enter the number of months or part thereof, the goods carriage vehicle was owned/ leased/ hired by you.
- Then enter the amount prescribed as income for that vehicle according to its capacity. Suppose a heavy vehicle (14 MT capacity) is leased by you for seven months. Then its income would be 14*1000*7= 98000. If other than a heavy vehicle is owned by you for five and a half months then, its income would be 7500*6=45000.
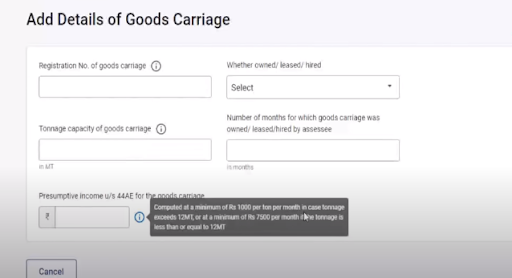
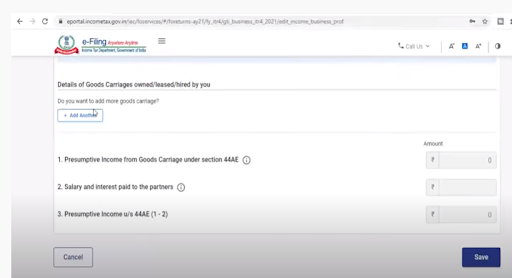
- Under this section, you are allowed the deduction of salary and interest paid to the partners if eligible. You have to enter the eligible amount. Then click ’save’.
- Your ‘ gross total income ’ part is now complete. Then confirm it and move to next section.
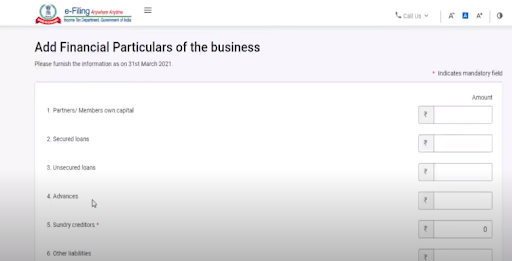
(3) Disclosures
- The next part is ‘ Disclosures’.
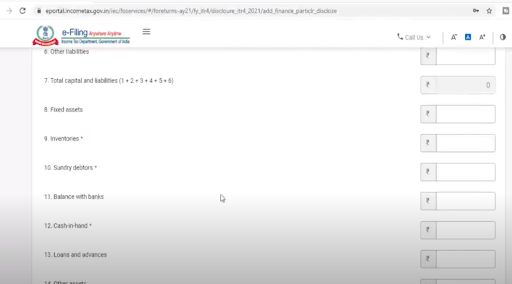
- Add the various financial particulars of your business as of 31 March 2021 like partner’s capital, secured and unsecured loans, advances made, creditors, other liabilities, debtors, inventories, fixed assets, cash in hand, and bank balance.
- Bank balance is not mandatory, but you should enter the balance as of 31.03.2021.
- It is not mandatory that the balance sheet should match. You can enter only mandatory tabs.
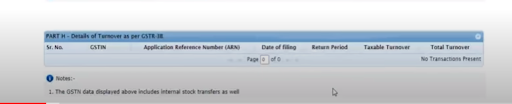
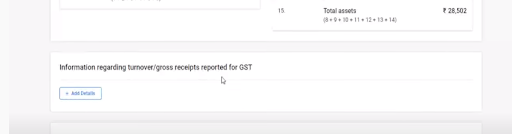
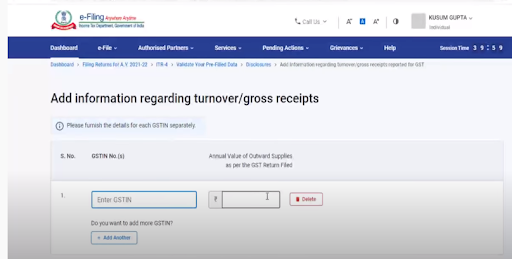
- You have also to provide your turnover, reported as per GST. Click on ‘Add details’.
- Then you have to enter your GST no. and the turnover as per the returns filed in GST. You should declare the same turnover as per GST, in Income tax also.
- You can add more GST numbers if multiple GSTINs are linked to the same PAN.
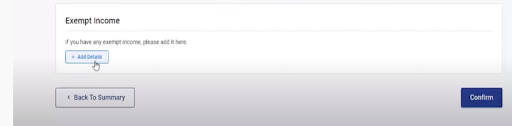
- You have also to provide details of exempt income in the same manner. Questionnaire wise or by drop-down list method.
(4) Filing and verifying
- Enter the deductions if any.
- Enter the amount of taxes paid.
- After all the parts of the return summary are completed, you have to pay the tax liability if any.
- Then preview your return. Especially see the points D17(Taxes Paid), D18(Tax payable), and D19(Amount of refund)
- Remove the validation errors if any.
- Then e-verify your return in the same manner (as in ITR 1).

- Thus you have successfully filed your ITR 4.
Related Topic:
Slump Sale Under Income Tax Act Along with Recent Amendments
CONCLUSION
From the news, we have come to understand that Infosys has asked till 15 Sept to rectify all the glitches. The due date for filing of return for assessees whose accounts have not to be audited has already been extended till 30 Sept. We think the department will have to extend it further. But still the portal is asking for interest for late filing of return. The department will surely bring an acceptable solution to end the woes of the taxpayers.
Consultant