Live demo for the filing of GSTR-1
Live demo for the filing of GSTR-1
Let us discuss the procedure for the filling of GSTR-1. The full procedure is discussed step by step with the help of live demo for the filing of GSTR-1. The due date for the filing of GSTR-1 is the 10th of the next month. So, keep in mind that the from May 2018 and forward the filing of GSTR-1 will be done before the filing of GSTR-3B.
For Example: – If you wanted to file the return of the month of January 2018, then the due date for filing of GSTR-1 is 10th Feb 2018.
This format will be applicable for the months after the April 2018. Because the due date for filing of GSTR-1 has been extended with the notifications.
So, file the return according to the dates which should be shown on the page for the filing of the Return. The due date for every return will be available on top of the return.
Step 1:
First, visit the GST portal at https://services.gst.gov.in/services/login and fill the ID and Password of the GST portal provided to you by the Department.

Step 2:
After logging into the GST portal. A page will open in which there will be an option to go directly to the GST Return dashboard.
If the option does not appear like this. Then you can also visit through the following route:
Services —– Returns —- Returns Dashboard.

Step 3:
After clicking on the ” RETURN DASHBOARD” button you will reach at the next page in which the there will be two scroll down options. One option is for selection of the financial year and other of the month or period for which you wanted to file the return.
Select the period and month for which you wanted to file the return and click the button “SEARCH”.

Step 4:
The GST portal will search for the returns to be filed for the period you have entered and view the returns for the period. If you have searched for the months which is the end of the quarter, then it will show a fourth table GSTR-4A. The rest three table are GSTR-1, GSTR-2A, and GSTR-3B. If the data you wanted to enter in the GSTR-1 is only a few entries then click on the button “PREPARE ONLINE” and proceed. But if you have prepared the JSON file using GST Utility for the returns then click on the button “PREPARE OFFLINE” and proceed.

Step 5: Offline Method
A page will appear after opting for the “Prepare offline”. There will be the option to upload the invoices and there will be the button to “choose file”. Click on the button “Choose File” and select the path of the JSON file stored for the month you opted to file the return for. Select the JSON file and proceed further. To upload all the details the portal will take some time. Wait for a while and check if the data is shown in the appropriate tables.

Step 6: Online Method
When we enter the page we see the that the GSTR-1 have separated into two parts. One is of invoice details and another one is of other details. Let us discuss part on(Invoice details) while filing of GSTR-1.
A page will appear after opting for the “Prepare online”. On this page, there are various no. of tables, starting from table B2B Invoices. This option is suggested if you don’t have much invoices file in the system. It will be much easier and fastest way if you don’t have many invoices. Let’s discuss the Tables and the data to be filled and how.

Step 7:
Let us start with table 4(B2B Invoices). Click on the table “B2B Invoices”. And a new page will appear. On this page, a button will be there on the right side of the screen in blue color which says “ADD DETAILS”. Click on the button to proceed further.

Step 8:
When you click and proceed the further. The table will open and there will be some blank boxes for filling in the information. The boxes of grey color are the boxes which are self-populated. The first box is of the GSTIN of the Receiver and after filing the GSTIN the next box of “Receiver Name” will be self-populated by the system. Then fill the details in the boxes properly. Place of supply will also be self-populated but you can change if the place of supply is different. In last you have to mention the taxable amount in the box in front of the applicable rate. After filling all the details in the boxes, please save the information by clicking on the button “Save”. And enter the next invoice just like this.

Step 9:
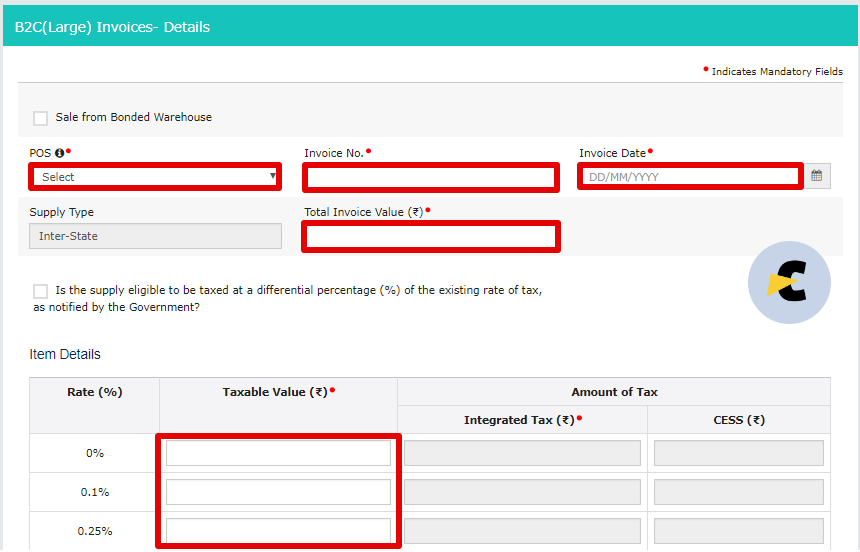
After filling the information of B2B invoices, the next table is of B2C(large). In this table, those invoices are filled in which the amount exceeds 2.5 Lakhs and the supply is of inter-state nature.
Click On “ADD INVOICES”.
In B2C(large) invoices are generated on the unregistered person which means, GSTIN no. should not be required. So, in this table place of supply, Invoice no., Invoice Date, Total Invoice value and the taxable value in front of taxable rate should be entered. After filling all the details, click on the button “SAVE” and proceed as further. When you have filled all the details and invoices then click on the button “BACK” to reach back to the pages of the tables.
Step 10:
When both tables of invoices are filled, there is the third table for the Credit notes and Debit notes. Table-9B is for the Credit/Debit notes issued by the registered person only.
In this table the basic details of the person who is issuing credit/debit note to/from to you(registered person). It contains the GSTIN, Debit/credit note no., Debit/Credit note date, Original Invoice no., note type(Credit note or Debit note) Value of the note(Inclusive of tax if any), type of supply and taxable value in the front of the tax rate applicable to the original invoice.
After entering all the mandatory fields please save the details before going back.

Step 11:
The same step is to be followed for the credit/debit notes issued to/from the unregistered dealer. Click on table 9B – Debit/Credit note(Unregistered).
In this table the basic details of the person who is issuing credit/debit note to/from to you(Unregistered person). It contains the type of note(B2CL,etc.), Debit/credit note no., Debit/Credit note date, Original Invoice no., note type(Credit note or Debit note) Value of the note(Inclusive of tax if any), type of supply and taxable value in the front of the tax rate applicable to the original invoice.
After entering all the mandatory fields please save the details before going back.

Step 12:
Table-6 is of entering/filling the details of export invoices which are zero-rated supply in GST regime. This table is made for goods as well as services, so don’t get confused to see the boxes of “Port Code ” and “Shipping Bill No./Bill of export”. These two boxes are not mandatory if you are in doing of export of services.
In this table the basic details should be filled like:- Invoice no., Invoice Date, Port code, Shipping Bill No./Bill of export, Total invoice value, GST payment(with tax or without tax) and if the export is with payment of tax then the taxable amount in front of the tax rate.
You can only export without payment of tax when LUT has been issued to you from the department. If you don’t have the LUT, then you should pay Tax and made the exports with payments with taxes.
Be careful while filing this table because if there is any small difference in the details filled in this table and the data with the customs, it may result in the delay of your refunds. Whether the refund is of tax paid during the export or ITC availed for the export.

Step 13:
After filling all the invoices the Table starts which is provided by the government to rectify or amend our mistakes while filing the last returns. For amendment, Table-9 is given and this table is further distributed in the total of five different tables. Let us discuss the first table. Table-9A Amended B2B invoices, this table is specifically made for amending the B2B invoices only.
Click on the 9C-Amended B2B invoices —– Enter the financial year and GST invoice no. which you wanted to amend(The invoice should be entered as B2b Invoice in previous returns).——- Click the button “Amend Invoice”.
A page will appear with the details of the invoice you wanted to amend. You can amend the GSTIN, enter a new invoice no. and date, place of supply, Total invoice value, taxable and tax rate by changing the row accordingly.

Step 14:
The same procedure is to be followed further for amendments in all tables. After B2B invoice in Table-9A Amended B2C(large) Invoices. Click on the table to proceed.
In this table, you can also change the invoice no. and date, place of supply, total invoice value, taxable value, and tax rate. But amending does not mean that you can delete or over wright the mistakes old data will stay in the database of GST portal.

Step 15:
Table-9A Amended Export invoices are to amend the export details filed in previous returns. Click on the table and enter the invoice no. you wanted to amend it. This amendment is most useful to the exporters because according to the GST department the shipping bill was wrongly filed or not filed in the previous returns. Because of that, the refund was stuck in the process.
This table can amend those invoices and help you to get your refund as quickly as possible for export. The port code and shipping bill are not required in the case of services. The rest of the details should be filled as per the requirement or as you wanted to amend. Enter the details and click on the button”SAVE”.

Table-9 also provides the amendments of Credit/Debit notes and the table separated on the basis of registration of the other party. Just like when we have to fill Credit/Debit note.
Step 16:
Now, let us discuss the other part(Other details) while filing of GSTR-1.
The first table is of B2C(Small). In this table, you only have to file the details of the person which does not cover under any other two tables filled before while filing of GSTR-1.
Click on Table -7 B2C(Others)—– Click on “ADD DETAILS”. A page having the options for details will show. In this table, The total value applicable under one GST rate and one state Should be entered Accumulating the value in this table. If the state or rate is to be different then you have to save the details and go back to add more details.
In this table only a few things are required like -Place of Supply, Taxable Value, and the rate applicable. Be careful while filing of GSTR-1 table-7 because another entry will be needed if rate or state will be different.

Step 17:
The next table is Table-8 for nil rated supplies. Nil rated supplies are the supplies which are allowed as nil rated by notification or circulars. It also includes the exempted supplies and Non-GST Supplies.
Click on Table-8 Nil-rated supplies. After clicking on the table page having four rows will appear. These rows are the combination of registered/ non-registered and inter-state/intra-state. Fill the details under non-GST, Exempt supply, and Nil-rated. You must be very careful when you are entering the information under these heads.

Step 18:
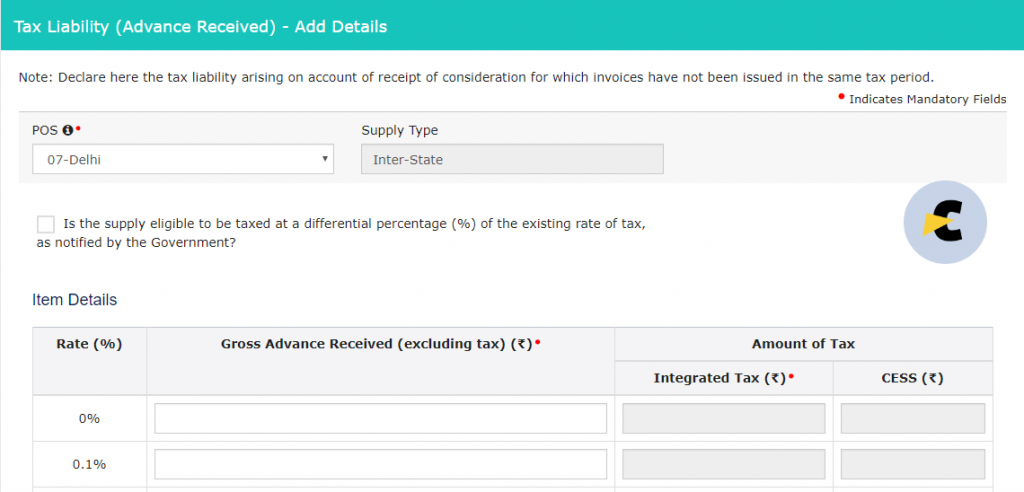
The next step of filing of GTSR-1 is to fill the table-11A of tax liability(Advance Received) and Table-11B of adjustment of advance. This table is to fill if you are receiving the advance for the supplies and charging the GST on it. But there is no compulsion to charge GST on the receipt of advance.
Step 19:
One of the most important tables was Table-12 for HSN wise summary of outward supplies. In this table, you have to fill in the details according to the HSN codes issued by the government. The one important thing to determine is to make sure, that the HSN codes should not be repeated while filing. The system won’t accepts the details. The same HSN code can be only used if the quantity is different.
So, please combine the quantity and sales value of the products having same quantity measurement and HSN code.

Step 20:
The next step is to fill the details of the documents you have issued to your client and the documents issued to you. It consists of the invoices of outward supply, Invoices for inward supply from the unregistered person, Revised invoices, etc. So, please be careful while filling the information that the information is filed under the correct head.

Step 21:
The last table in the filing of GSTR-1 is table-10 Amended B2C(Others). This table provides you to amend the total amount for the particular period and state to amend. You should first select the year, month and original place of supply. When you enter these the table filled with the previous data will appear on. You can change the details in that table and save the data.

Step 22:
After, filling all the details in all the tables you should click on the acknowledgment for providing the correct details to the department and submit the return for further process. When you are sure that the data is correct and true.

Step 23:
After submitting the return the option for filing the return will appear after some time. Click on the button “FILE RETURN”. After clicking on the button, a new page will appear in which the name of the authorized person is available in drop down. Select the name of the person and select the option for filing the return. There are two options, one through DSC and another is through EVC in which OTP.
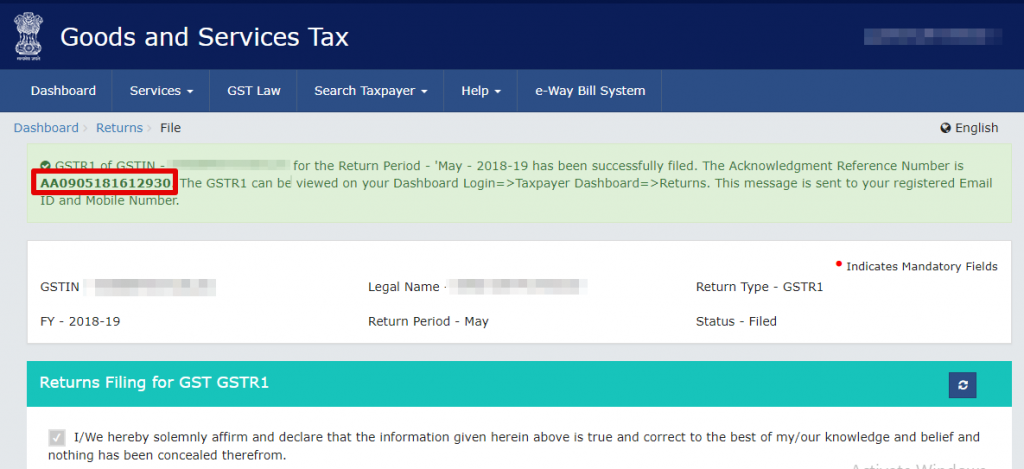
As a confirmation, a Dialogue box will appear and it will contain ARN no. as confirmation of filing of GSTR-1. So, take a screenshot as a proof for the filing of GSTR-1.
Learn what you can, nothing is useless.