GST Login – Step by Step Guide on How to Login to Government GST Portal India
GST portal is a large citadel having many hidden chambers and secret pathways. Every business man has to become Arjuna and not Abhimanyu to pass through this conundrum and file his monthly returns and pay taxes smoothly. Today we shall tell you, how to sail effortlessly through this portal, because you have already heard,” yeh ishq nahin aasaan, itna samjh leeje, yeh aag ka dariya hai aur doob ke jaana hai.” Therefore you must have complete knowledge of all its functionalities to remain afloat and reach to the other side safely.
Table of Contents
What Is GSTN (Goods and Service Tax Network)?
GSTN is a section 8 (Non profit) government company ( Previously it was a private company, but after constant criticism, it was converted to a government company), which is constituted to manage the functioning of GST. It is of extreme importance as it has access to sensitive data regarding India’s industry and businesses including many PSUs and defence procurement etc which could even affect national security.
What Is the GST Login Portal?
GST login portal is www.gst.gov.in. It is the one stop destination to all the things related to GST. It is like a single key to various locks. From registration to return filing to cancellation of registration, all these tasks can be performed at this portal. To put it in colloquial terms, it is from “womb to tomb” for all registrations. When GST was introduced in July 2017, there were around 64 lakhs existing taxpayers registered under various indirect tax laws. Along with them many more were expected to register under this act. Therefore a very robust, quick, and resilient portal was needed which could handle such a large number of taxpayers and other allied services. Since GST envisaged tracking and matching of every invoice raised by a registered dealer, the amount of data that was going to bombard the portal was mind boggling. Hence this GST portal was formed as the technological behemoth to act as an interface between the department and the taxpayer. It performs all the functions of tax management like tax determination, tax collection, refund, management of taxpayers, distribution of revenue among States and Centre etc. By March 2018 there were more than 1.03 crore registered persons. Therefore this portal was upgraded to handle 3 lakh returns simultaneously. Some of its functionalities are;
- Registration of a new taxpayer
- Return filing
- Checking the GSTIN of other parties
- Refund application
- Voluntary payment of tax
- Appeal to the authorities
- Cancellation of registration
Who Has to Register for the GST?
Apart from voluntary registration following persons have to get registered under this act mandatorily.
- Any supplier of goods, whose turnover has exceeded the prescribed limit ( 40 lakhs) in a financial year.
- Any supplier of services, whose turnover has exceeded the prescribed limit ( 20 lakhs) in a financial year.
- Any supplier of goods or services or both making interstate supplies. However, persons making inter-state supplies of taxable services and having an aggregate turnover, to be computed on all India basis, not exceeding an amount of twenty lakh rupees (ten lakh rupees for special category States except J & K) are exempted from obtaining registration vide according to Notification No. 10/2017-Integrated Tax dated 13.10.2017.
- A person receiving supplies on which tax is payable by the recipient on a reverse charge basis.
- Casual taxable person who is not having a fixed place of business in the State or Union Territory from where he wants to make a supply.
- A non-resident taxable person who does not have a fixed place of business in India.
- A person who supplies on behalf of some other taxable person (i.e. an Agent of some Principal)
- E-commerce operators, who provide a platform to the suppliers to make supply through it. They also have to collect TCS (under GST Act) from the suppliers of goods and services through them if conditions are fulfilled.
- Suppliers of goods and services who supply through such e-commerce operators. Persons supplying services through e-commerce operators need not take compulsory registration and are entitled to avail the threshold exemption of Rs. 20 Lakh as per Notification No. 65/2017-Central tax dated 15.11.2017.
- Those eCommerce operators who are notified as liable for GST payment under Section 9(5) of the CGST Act, 2017
- TDS Deductor
- Input service distributor
- Those supplying online information and database access or retrieval services from outside India to a non-registered person in India. (OIDAR services)
What Is the GSTIN?
The Goods and Service Tax Identification Number (GSTIN) is the unique number (15 digits alphanumeric number) each taxpayer will receive once registered on the common portal. It is based on a taxpayer’s PAN. For e.g
- GSTIN 07 AESPG9561Q 1Z8
- First two digits 07 State code
- AESPG9561Q Pan No of the person
- 1 No of registrations in that state
- Z default alphabet
- 8 Check sum digit
What Are the Documents Required for GST Registration?
The various documents that you will need for registering your business under GST:
- Permanent Account Number (PAN) of the applicant
- Copy of the aadhaar card of the person(who is proprietor/ karta/ partner/ director)
- Proof of business registration or incorporation certificate
- Identity and address proof of proprietor/ partner/promoters/directors along with a photograph
- Authorisation letter/board resolution for authorised signatory
- Consent letter/ lease deed/ rent agreement/ electricity bill for ownership for proof of principal place of business
- Digital signature
GST Login: How to Register for GST?
Before logging in the GST portal to avail the various services, you have to get yourself registered. GST Registration is a process by which a taxpayer gets himself registered under GST. Once a business is successfully registered, a unique registration number is assigned to them known as the Goods and Services Tax Identification Number (GSTIN).
Step by step procedure for GST registration
The procedure to obtain a GST registration can be performed easily by the taxpayer himself and is without any charge.
- A taxpayer seeking a normal registration can visit the GST portal (www.gst.gov.in) and fill the registration Form GST REG-01. It is divided into two parts. Part A and Part B. You will have to fill one part completely in one go to save it. Incomplete parts cannot be saved.
- On the home page you scroll down and click on, ”register as Taxpayer”

- A new window will appear, asking for ‘User credentials’. Click on “New Registration”
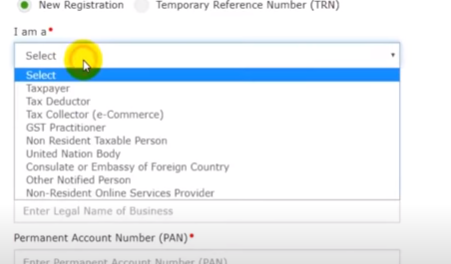
- The portal will ask you, for your status, for the purpose of registration. From the drop down list, you can choose any option in accordance with your status. Click on I am a ‘Taxpayer’, since you are registering as a taxpayer.
- Enter your State, District, legal name of the business ( name as on the PAN Card ), PAN No, Email Id, Mobile No. Make sure that your mobile number and Email Id are active because you shall receive OTPs in the process and also for further communication.

- After entering all the data, you shall receive two OTPs. One on your mobile and another on your email Id.
- In the next screen you have to enter both these OTPs separately and then a Temporary reference number (TRN) will be generated. It is an acknowledgement that you have successfully completed the ‘Part A’ of the Registration form. For filing part B you will need this number.
- Take a screenshot of this TRN number. It will be used for your further process and also for relogging from where you left.
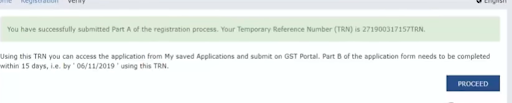
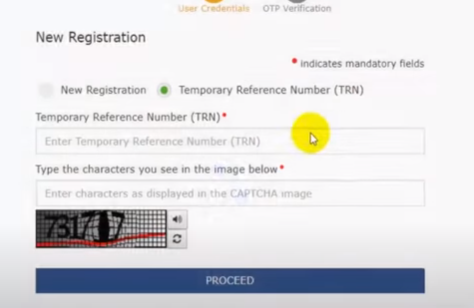
- This TRN is valid for 15 days. Now if you have to log in again to complete Part B, then enter the ‘TRN’ instead of ‘New Registration’.
- For Part B, Enter the TRN and the ‘Captcha’. You will receive an OTP on your mobile.
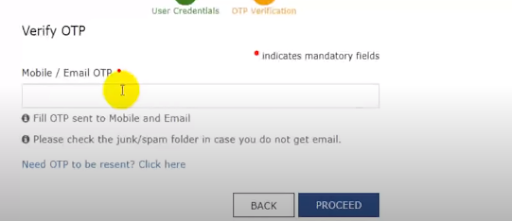
- After entering the OTP, Your saved Application will be displayed.

- Your ‘dashboard ‘ will be depicted. Status of your application, will be to ‘draft’. Click on ‘Action’, for the further part of the form.
- Part B of the Application.
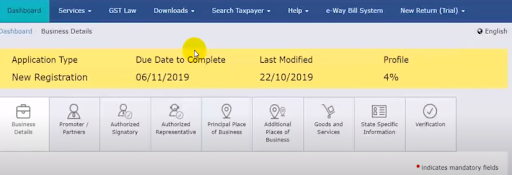
- It has some information heads which have to be completed. It also has a percentage of profile completion. Profile has to be completed 100% to get registration.
Business details
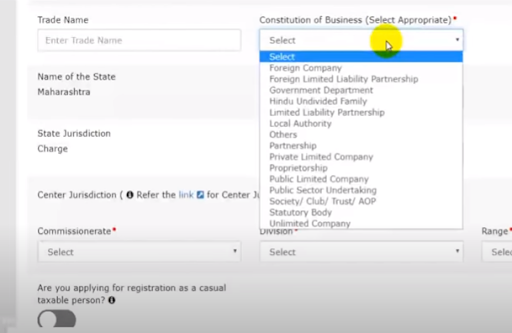
- Click, ‘business details’. Enter your Trade name and business constitution. The state will be auto filled. Choose the constitution of your firm from the drop down.
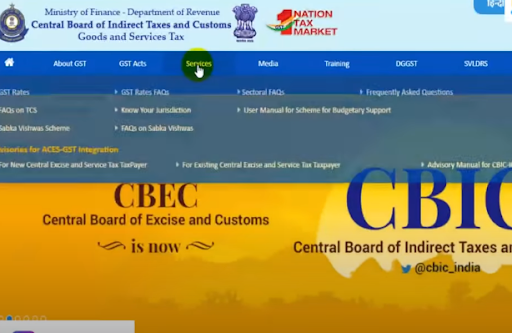
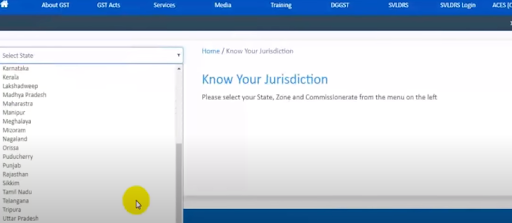
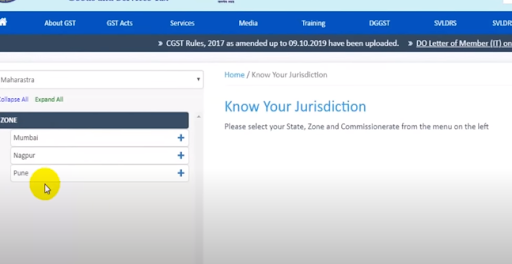
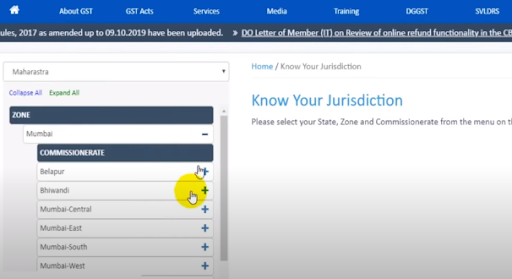
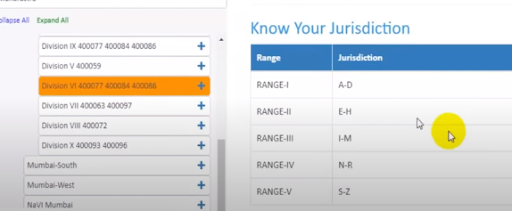
- For the tax charge and jurisdiction, click the “i” link for centre jurisdiction, which will take you to the CBIC website. There you choose,’Know your jurisdiction’.
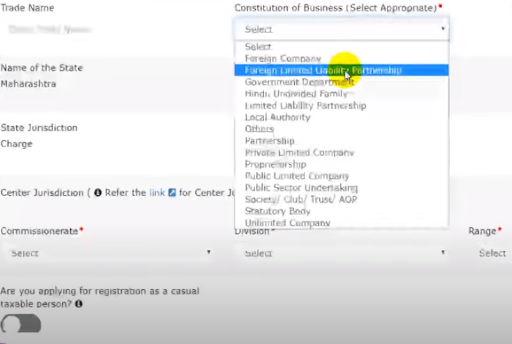
- Choose your State, Zone, Commissionerate, division and range and then enter into the form. Don’t be bothered about the range because it can again be chosen after getting the registration.
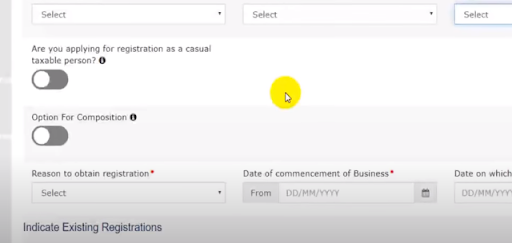
- Then you will see two options. One for a casual taxable person and another for composition scheme. If you are eligible for any of them, then click on them, otherwise leave them.
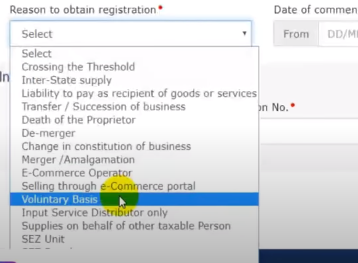
- Next enter your reason for getting the registration from the dropdown list. Most people choose ‘voluntary basis’ or ‘crossing the threshold limit’. You Can choose your reason.
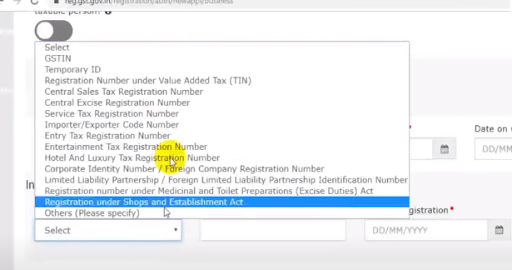
- If you are already registered under any other act, then specify from the dropdown. Enter its details and move forward. This head is complete. Click on ‘Save and continue’.
Personal information of the main responsible persons
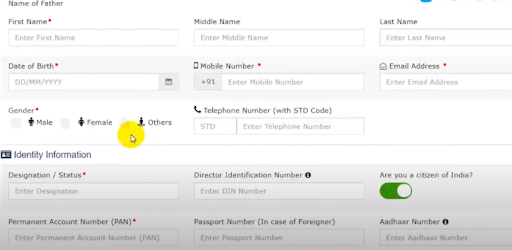
- The next head is for the ‘personal information of the main responsible persons’.They may be proprietor/ partners/ directors.
- You have to enter the personal information of each individual separately. Enter the name, father’s name, residential address (preferably as on Adhaar), date of birth, mobile No, e-mail Id, gender, PAN no., Adhaar No., State, District, Pin Code, designation status.
- If the person is a director then his DIN no. also.
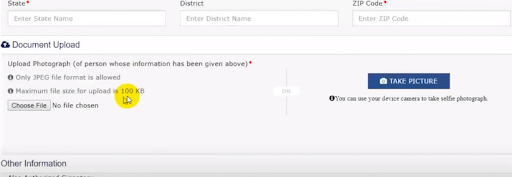
- Also upload his photograph. Ensure that the photo is in JPEG format and the size of the photo must be within the uploading limits. There is also an option of taking the picture instantaneously.
- Then the form asks that, if the person is also the authorized signatory. If yes, click the option.
- Click “Save and continue”. Then perform the same procedure for the next individual if applicable (in case of partners or directors).

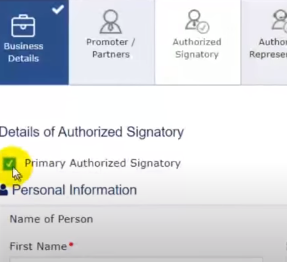
Authorized Signatory
- Then move to the third heading. It is of ‘Authorized Signatory’. If you have already made any person/persons an authorized signatory, then no need to fill it again.
- You have to just click on the left hand side corner on ‘ Primary Authorized Signatory ‘.
Authorized representative
- The fourth heading is of ‘Authorized representative’. If you have made any person your authorized representative then click it, otherwise leave it.
- This section is of importance for all those businesses who are looking to employ the services of a GST practitioner or any other tax expert to handle their returns filing on the GST portal.
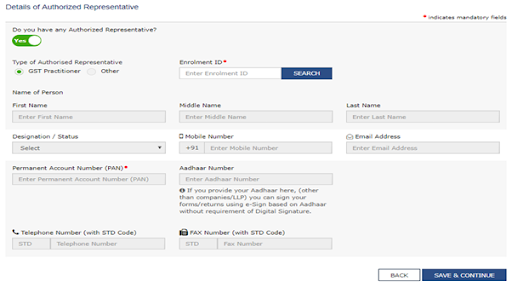
- Do you have any Authorized Representative? (Yes / No; if you select No, the page will remain as it is; if you select Yes, the page will expand and other fields will emerge)
- Type of Authorized Representative (GST Practitioner / Other)
- In case you have selected the GST Practitioner option in the field Type of Authorized Representative, the Enrolment ID field will get activated and all other fields will become inactive.
- Enrolment ID (Active only if you select GST Practitioner option in the field Type of Authorized Representative)
- At the end of this page, click Save & Continue.
- In case you have selected the ‘Other’ option in the field Type of Authorized Representative, the Enrolment ID field becomes inactive, and the other fields become active.
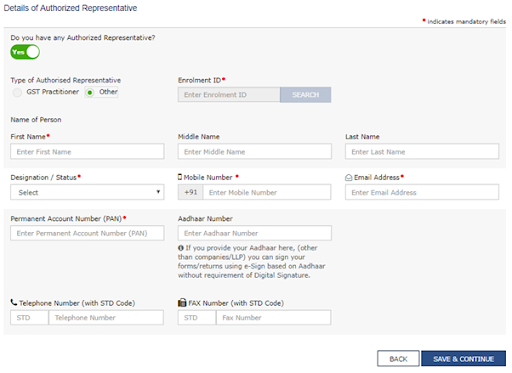
- Enter name of Person, Mobile no., Email Address, PAN, Aadhaar Number (If you provide your Aadhaar here, (other than companies/LLP) you can sign your forms/returns using e-Sign based on Aadhaar without furnishing the Digital Signature), Landline phone and fax no.(if any)
- Choose the Designation / Status (Select from list) of the Authorized Representative
- Chartered Accounting holding COP
- Company Secretary holding COP
- Cost Accountant holding COP
- Lawyer currently licensed to practice
- Retired employee of Centre / State Revenue Department
- At the end of this page, click Save & Continue.
Principal place of business
- The fifth heading is ‘Principal place of business. Enter the address, district, pin code, Official phone number and e-mail Id.

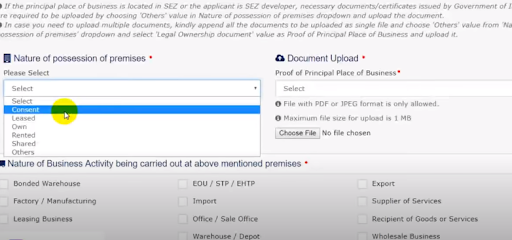
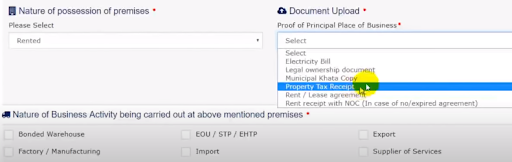
- Enter the type of document on whose strength you’re making that premises your principal place of business. It could be a consent letter from the owner, or a lease/rent deed or could be owned by the enterprise. You have to upload that supporting document.
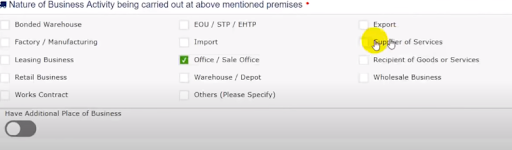
- Choose the business activity you intend to/ carrying out at that pemesis.
- Click on ‘Save and continue’ and proceed to the next heading.
Additional Place of business
- The next heading is ‘Additional Place of business. If you have any godown or any branch office, then click this heading and enter its details. Otherwise, leave it.
Goods or services
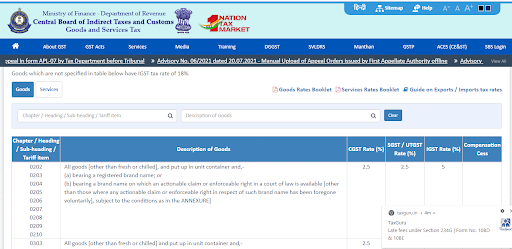
- The next heading is the main ‘Goods or services you are dealing in. Again go to the CBIC website and look for HSN (Harmonized System of nomenclature) codes of five main goods you intend to/ currently dealing in. For goods, HSN is used.
- For services, SAC (Service Accounting Code) is used. SAC always starts with ‘99’. After finding their HSN or SAC, fill them on this page. Now click on ‘Save and continue’
State specific Information
- The ensuing heading is ‘State specific Information’. This is not mandatory. Enter the relevant data only, which is applicable to you.
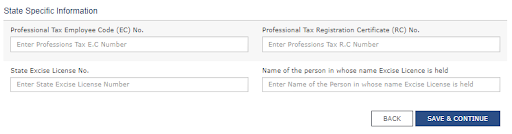
- Professional Tax Employee Code (EC) No.
- Professional Tax Registration Certificate (RC) No.
- State Excise License No.
- Name of the person holding the Excise License
- Click ‘Save & Continue.
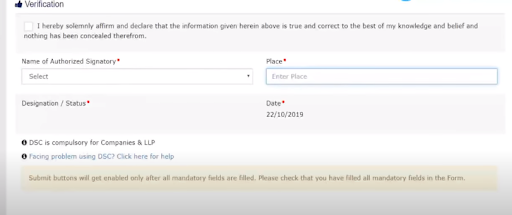
Verification and submission
- Select the name of the authorized signatory from the drop down list.
- Enter the place and verify the application form through EVC (OTP) verification received on the registered mobile number and email of the Authorized Signatory or using his digital signature certificate.

Receipt of ARN and GSTIN
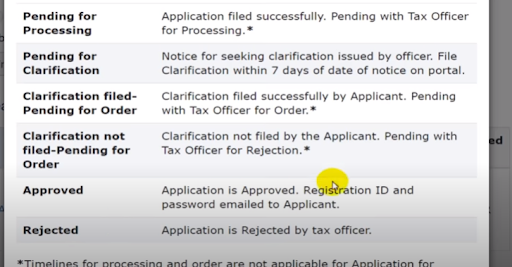
After the Application Form is submitted, you will receive an email mentioning the Application Reference Number (ARN). This application form is subject to mandatory verification in the GST portal, as it is connected to both Income Tax and Adhaar portal, based on which your application would get approved or rejected.

Normally, the form is approved or disapproved in 5 days. Once your New Registration Application has been verified and approved in the GST portal, you will receive your new GST number along with a provisional User Id and temporary password on your email. They will be used for your first login into the portal.
In some situations, there might be certain fields for which some more explanation or further documentary proof might be additionally required from your side. In such cases, a Show Cause Notice (SCN) will be attached to that field and the Reference No. will be intimated to you via SMS and Email.
Alternatively, you can follow the procedure again to log into the portal, navigate to the notification/ exact page and field where the clarification is needed, and use the same to provide relevant clarification & also to upload the required documents requested in the Show Cause Notice (if any)
GST LOGIN: How to Track Registration Application Status?
You can follow the below steps to find the status of your GST Registration application:
Step 1: Logging in GST portal
- Visit the GST Portal.
- Select Services. Then go to Registration. From there go to Track Application Status.
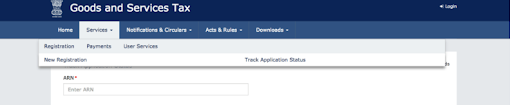
Step 2: Enter the ARN number
- Enter the ARN number received by you after the submission of the GST registration application in the place provided.
- Complete the CAPTCHA.
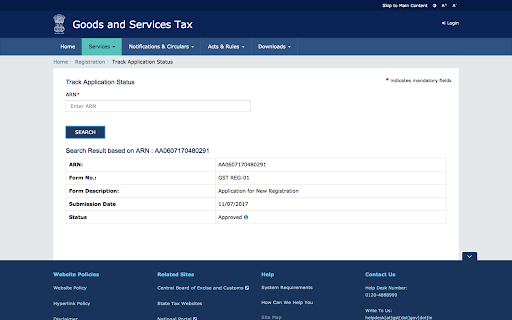
Step 3: GST Registration Application Status
- Then click on ‘search’. The portal will display the GST registration application status.
- If your GST registration application has been approved, then the portal shall display the status as ‘approved’
GST LOGIN: What Is the GST Login Procedure for First-Time Users?
When you have received your GSTIN, temporary password, and provisional user Id, you have to perform the following procedure for the ‘First time login’.
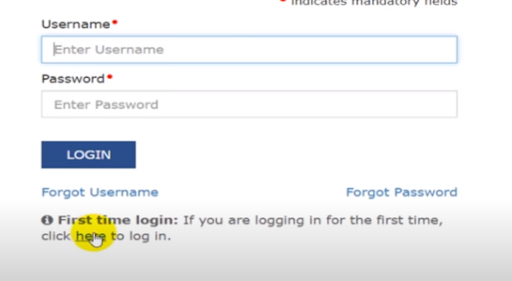
- Visit the GST portal. Do not enter your credentials in the usual space provided for entering them. Instead, click on ‘here’ written just below ‘Forgot username’ in the ‘First time login’ field.
- Upon clicking, the below screen will appear.
- Enter your GSTIN/ provisional user Id and the password in the space provided.
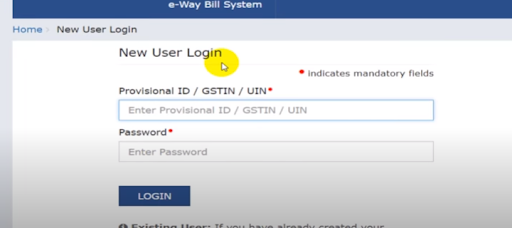
- Then press ‘Login’. Then the below screen will appear.
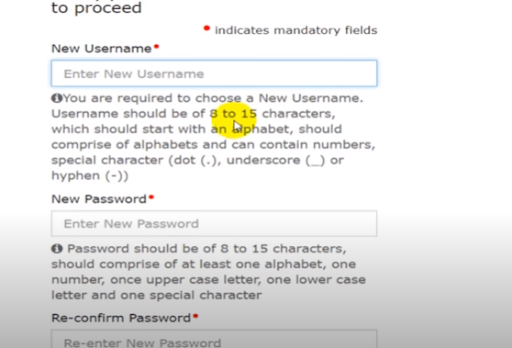
- Make your new Username and new password in accordance with the stipulated conditions mentioned above. The username must start with an alphabet and can contain numbers, alphabets, special characters (dot ., underscore_, hyphen – ). It must be of 8 to 15 characters.
- The password must be 8 to 15 characters consisting of at least one uppercase letter, one lowercase letter, and one special character. Reenter the same password correctly.
- Then you shall see a message saying that your new user Id and password have been successfully generated.
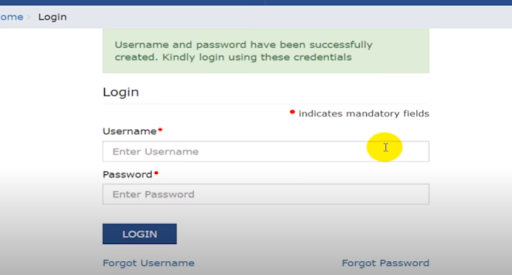
- This newly generated UserId and password can be used for subsequent logins.
GST Login: What Is the GST Login Procedure for Existing Users?
After the First time login by the newly registered person, the procedure for subsequent login and procedure for existing users is the same. They can follow the below mentioned steps;
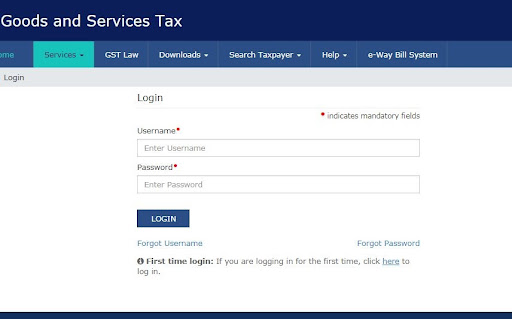
- Visit the GST portal. Click on ‘login’ on the right hand side corner of the home page. Then you will see the above screen.
- Enter your newly made user Id and password. Then click on ‘Login’.
- Now you have successfully reached your dashboard and you can start availing of the various services available on the dashboard.
- You can go to ‘returns’ and start filing your returns.
 Notes:
These are two things you should definitely do after getting yourself registered.
(1) Bank Account
When you do the subsequent login you will get a popup for entering your bank details. Previously the bank details were needed at the time of registration. But it resulted in a catch 22 situation because the banks asked for a GST number for opening the current bank account. Therefore, now this has been removed from the registration process and brought to a later stage i.e. after a person has got registration.
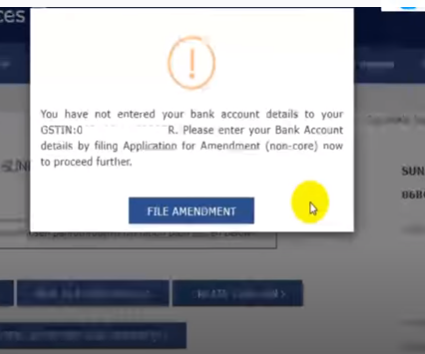
- This pop up will keep on appearing until you enter your bank details in the non core field. You now have to click on ‘File amendment’.
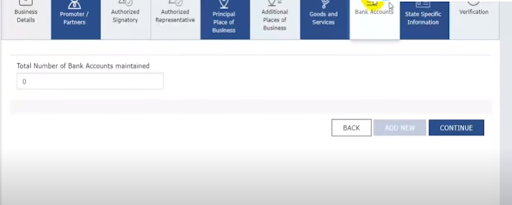
- The below screen will appear.
- Enter the number of bank accounts you have in the name of the registered person. Then click ‘continue’
- Then enter your account number, type of account, IFSC code, and upload the supporting documents.
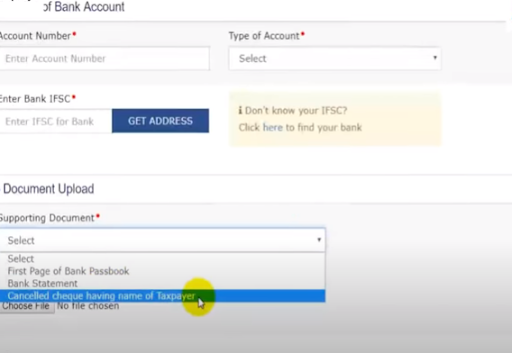
- Then your bank details will be permanently fed into the system and the popup will stop appearing.
(2) Downloading of GST certificate
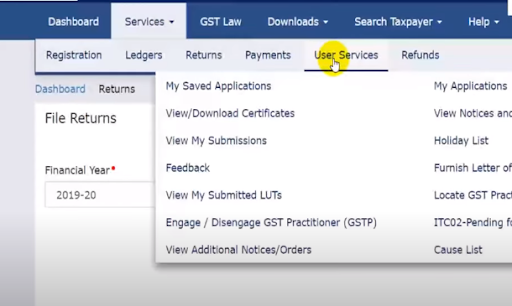
- Upon getting registered, it is mandatory to affix your GSTIN and the certificate on your premises. Therefore you have to download the same from the portal.

- First, go to services and then to user services. Then click on ‘View/Download Certificates’.
- Then the above screen will appear. Then click on ‘Download’ and your certificate will be downloaded. Take its printout and affix it at your premises.
How to Check Existing GST Registration Status or Confirm the Name?
If you would like to check the status or validity of any existing GST registration, then you can use the following steps.
Step 1: Visit the GST Portal
- Log in the GST Portal.
- Firstly select Services and then go to User Services.
- Then press, ‘Search Taxpayer’.
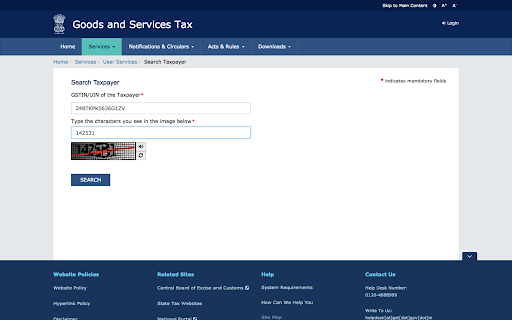
Step 2: Enter the GSTIN Number
- Enter the GSTIN number of the person, whom you want to confirm the name of, or check his registration status, in the place provided and complete the CAPTCHA.
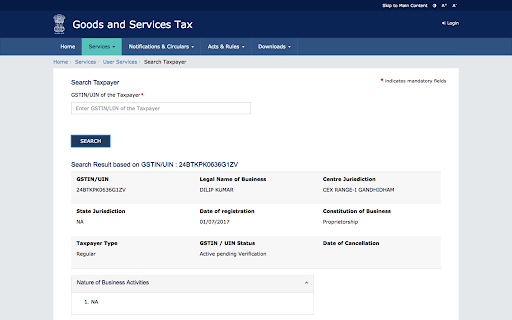
Step 3: GST Registration Status
- Then click search, the portal displays the legal name of the taxpayer along with his status of registration, as shown below:
GST Login: How to file for cancellation of GST registration in Portal?
 If for any reason, you are constrained to get your GST registration cancelled or surrendered, then you can follow the procedure mentioned below;
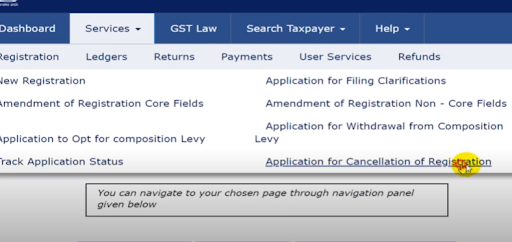
- Login to the GST portal. Enter your login credentials and go to ‘services’.
- Then go to ‘Registration’ and then click on ‘Application for Cancellation of registration.
- The below visible screen will appear.
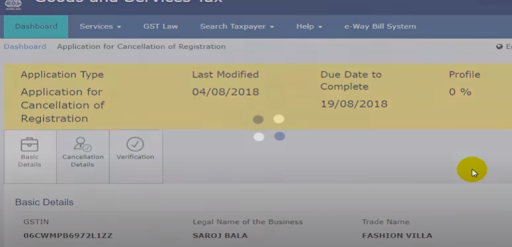
- There are three information headings visible. You have to complete each of them one by one.
(1) Basic Details
- First click on ‘Basic details’ and the below visible screen will appear
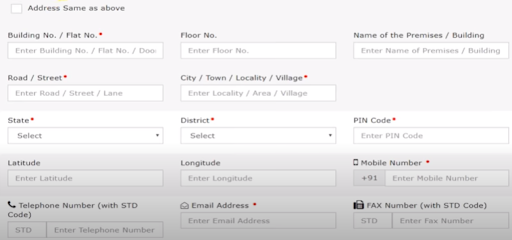
- This screen is asking for the address of your principal place of business. Enter all the details like, address, state, district, Pincode, official telephone number, and email Id.
- Then enter your trade name in the space provided as shown in the picture below. Select the constitution of your enterprise. Select the central jurisdiction, commissionerate, division, and range that you had previously selected at the time of getting registered.
- Then you have to enter your address for any future correspondence. It may be the same or different from the address of the principal place of business.
- This page is complete. Then click on ‘Save and continue’ to proceed to the next page.
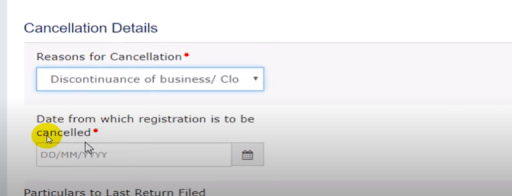
(2) Cancellation Details
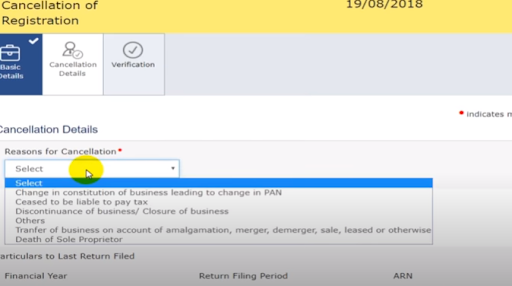
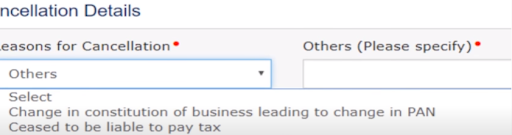
- Select the reason for your cancellation from the given list in the dropdown. You can choose any one of the five given reasons according to your situation. If your reason is different from the already mentioned, then you can choose ‘other’.
- If you choose ‘Other’, then you have to specify the reason.
- If you choose ‘Transfer, Merger or Change in Constitution’, then you have to enter the GSTIN of the transferee entity under the Details for Transfer, Merger or Change in Constitution section. The system will validate the same, and based upon its legal Name of Business, will auto-populate the Trade Name.
- Only in this case the input tax availed by the former entity on the pending stock if any has not be reversed. Since the new entity will continue the operations and pay output tax on the taxable supplies (including the pending stock) made by it and adjust the ITC of the erstwhile entity.
- In all the other cases, the ITC availed by the entity, getting its registration cancelled must provide the details of the pending stock (along with the invoices), calculate the corresponding output tax (on the purchase price) on it.
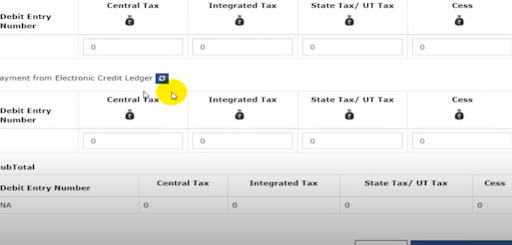
- It has to be paid from either the Electronic Cash Ledger, or the Electronic Credit Ledger, or both.
- After submitting the form, the tax amount will be deducted from the respective Electronic Cash Ledger, or the Electronic Credit Ledger, or both, and debit entries will be made.
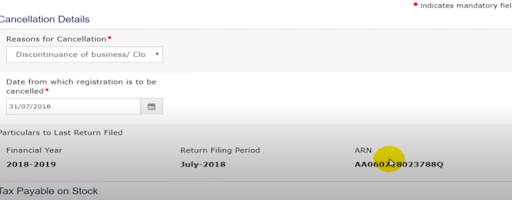
- Then you have to enter the date from where you want the registration to be cancelled.
- The portal will auto populate the last return filed by you.
Auto populated last return
Calculation of output tax on pending stock
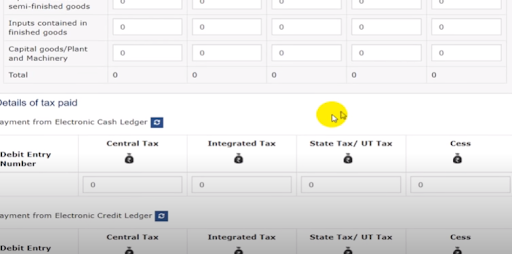
Details of tax paid by the debit entry made from the electronic cash or credit ledger
- All the returns due before the date of cancellation of registration must be filed and there must be no liability pending for the entity.
- After competition of this page, click ‘Save and continue’
(3) Verification
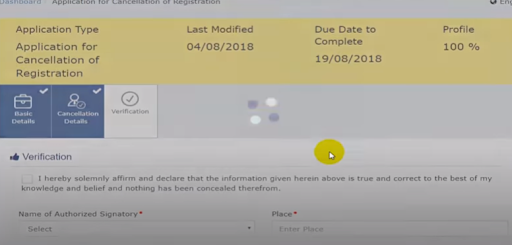
- Checkmark on the affirmation as shown above and select the authorized signatory from the drop down list.
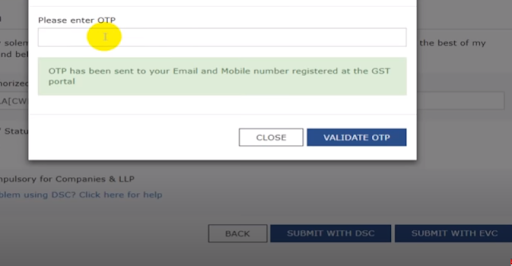
- Enter the place and verify the cancellation form through EVC (OTP) verification received on the registered mobile number and email of the Authorized Signatory or using his digital signature certificate.
- Enter the OTP received and click ‘Validate OTP’.
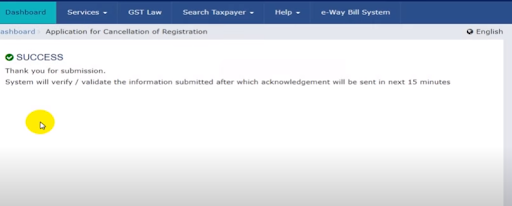
- After that, the system will display a message that your application for cancellation has been successfully submitted and you will receive an acknowledgment in 15 minutes.
- After this process, the concerned Tax Official will review your application and make a decision accordingly.
- To view the ARN, click on the “Track Application Status” under the services tab that is visible on the home page.
OTP verification
Message Received
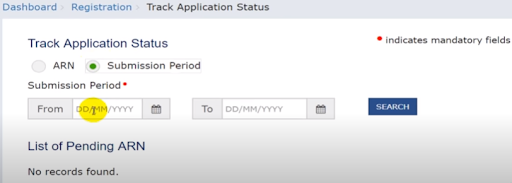
Track application status
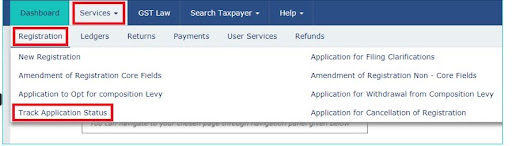
- Select the ‘Submission period’ tab. Enter the date of your application for cancellation and then click on ‘search’.
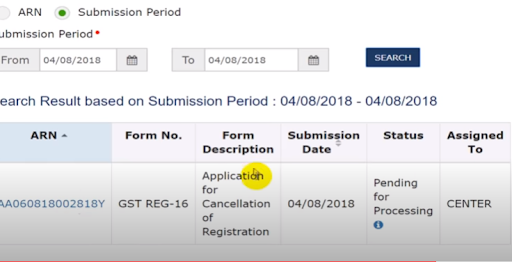
- You will get the ARN number. Click on status and you will see the below screen containing the status of your application.
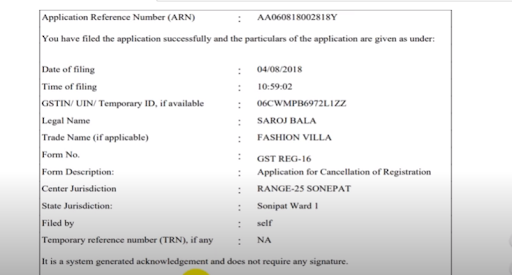
- When you click on ARN you will get the complete details regarding your application.
Status of application
Details of the application
Who is Entitled to File GST Cancellation Application?
Under the CGST Act the following persons can voluntarily apply for a cancellation of registration:
- All registered taxpayers except persons regulated under rule 12( persons requiring to deduct or collect tax at source) and Taxpayers granted with UIN.
- The legal heir of a registered person, in case of his death.
Who Can Cancel GST Registration?
An Officer under GST can either on his own accord or upon receiving an application;
- filed by the registered person or
- by the legal heirs of the registered person, in case of death of such person,
can cancel a GST registration.
Note- Previously a person who had obtained GST registration voluntarily could not apply for GST Registration cancellation before the expiry of a 1 year from the effective date of registration. But now this provision has been rescinded.
Grounds of Non-acceptance of Application
Upon receiving the application for cancellation of registration, the concerned officer may decide against accepting the application due to the following reasons;
- The submitted application is incomplete.
- If the reason mentioned for cancellation request is ‘transfer, merger or amalgamation of business, and the new entity hasn’t registered with the tax authority before the submission of the application.
In these situations, the concerned officer intimates the nature of the discrepancy through a written intimation to the applicant. The applicant must respond to the same within seven days of the date of receipt of the letter. If the applicant does not reply, the concerned officer may reject the application after providing him/her with an opportunity to be heard. Reasons for the rejection must be recorded in the intimation letter.
Grounds on Which an Officer Shall Cancel the Gst Registration Granted to a Person
The proper officer in his wisdom can cancel the registration of a registered person if;
- The taxable person under GST is not conducting any business from the declared place of business; or
- He has issued only the Tax invoice for outward supply but has not supplied the actual goods or services mentioned in the invoice. (Fraudulently giving ITC, without the supply of actual goods or services)
- Violates the anti-profiteering provisions (for example, not passing on the benefit of ITC to customers)
- Violating Rule 86B i.e. Utilising the ITC from electronic credit ledger to discharge more than 99% of the tax liability for specified taxpayers with the total taxable value of supplies exceeding Rs.50 lakh in the month, with some exceptions.
- A taxpayer who cannot file GSTR-1 due to non-filing of GSTR-3B for more than two consecutive months or one quarter for those who opted for the QRMP scheme.
- The taxpayer has availed the input tax credit in violation of the provisions of section 16 of the Act or the rules.
Prior to the cancellation of registration, the proper officer would give a chance of being heard to the taxpayer by issuing a notice to such a person whose GST registration is liable to be cancelled. According to the notice, the taxpayer has to show cause within seven working days from the date of service of such notice as to why his GST registration should not be cancelled. The registered person has to reply to the show cause notice within the prescribed time, otherwise, the GST registration shall be cancelled.
Revocation of cancellation of GST registration
It means that when the Tax officer cancels the gst registration of a taxpayer on his own motion then the taxpayer can file an application to reverse the decision of the tax officer.
- Within the 30 days from the date of order of cancellation. A registered person can submit the application for revocation of cancellation of his GST registration, in form GST REG – 21, if his registration has been cancelled suo-moto by the tax officer.
- If Proper officer is satisfied from the application filed by registered person then he can revoke the cancellation of registration within 30 days from the receipt of such application.
- Also, PO can can reject the application by order in FORM GSTREG – 05 & communicate the same to the taxpayer
- Before rejecting the application, PO will have to issue an show cause notice to applicant in FORM GST REG -23. The applicant wil have to submit reply in FORM GST REG-24 within 7 working days.
- PO will make final decision within 30 days from the date of receipt of clarification submitted by applicant in FORM GST REG-24.
Update –
As per Notification No. 34/2021 – Central Tax dated 29th August, 2021, where a registration has been cancelled under clause (b) or (c) of sub-section (2) of section 29 of the said Act and the time limit for making an application of revocation of cancellation of registration under sub-section (1) of section 30 of the said Act falls during the period from the 1st day of March, 2020 to 31st day of August, 2021, the time limit for making such application shall be extended upto the 30th day of September, 2021.
Conclusion
I hope that after reading the article you must have gathered enough confidence to at least give it a try in logging in to the GST portal and explore its various functionalities and allied services.